


di Paolo Dj Fresella Colacicco
Quando parliamo di giradischi – o meglio di turntable – la prima immagine che ci viene in mente è quella del nostro fidato piatto Technics 1200: da tempo in pensione, ne ricordiamo innanzitutto il design fiero e robusto. Al giorno d’oggi tantissime case hanno sviluppato, partendo da questo storico modello, nuovi progetti e giradischi sempre più completi, equipaggiandoli con nuove funzioni malgrado il lento tramonto del vinile. La casa Giapponese Vestax ha pensato di portare il Turtablism “all’estremo”, dando la possibilità al dj di utilizzare il giradischi come un vero e proprio strumento musicale.
Prima impressione
Tolto dall’imballaggio, il giradischi Vestax Controller One risulta un tantino generoso con le misure, rispetto ad esempio ad un classico giradischi Technics. Misurandolo in posizione verticale (ossia, per intenderci, messo in posizione da turntablist) i suoi numeri sono 48 x 37,5 x 12,5 cm. Il design è molto moderno, con lo chassis lucido e particolari abbellimenti eleganti come la base del braccetto a specchio. Il giradischi è mantenuto da robusti piedi ai quattro lati della base, regolabili e resistenti a sollecitazioni e vibrazioni.
Montaggio
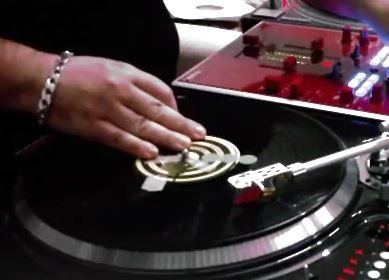
Il montaggio dei componenti è molto semplice e rapido (Fig.1): c’è da posizionare il piatto, fissandolo con due viti (ovviamente in dotazione), ed incastrare il peso che serve a bilanciare il braccetto dove poi andrà posizionata la classica shell brandizzata Vestax con la puntina (non in dotazione) (Fig.1b). Oltre al manuale, nella scatola troveremo anche un cavo di media lunghezza RCA per il collegamento del controller al mixer. Qualora non fosse già chiaro, perfino il design del giradischi ci fa capire che questo strumento è stato creato per essere utilizzato in maniera verticale: la posizione dei tasti delle note, il display ed il resto dei comandi, dei quali parleremo in seguito. 

Il giradischi
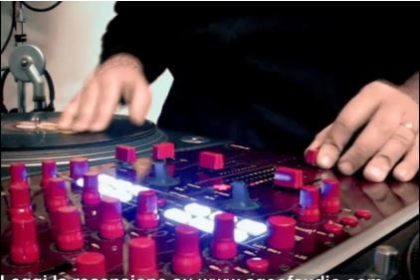
Il giradischi Vestax Control One, oltre a possedere le caratteristiche normali di un piatto professionale per dj ha indubbiamente comandi aggiuntivi che fanno la differenza (Fig.2). Oltre ovviamente al piatto ed al braccetto dal design innovativo, o quanto meno avveniristico, il Control One conta la bellezza di 30 tasti sapientemente posizionati e con funzioni specifiche. Un ampio fader/pitch, due mini stick bidirezionali a molla, un knob a rotazione continua ed un mini trimmer. Ed ancora, un ampio display retroilluminato da LED a 7 segmenti che indicano le note musicali e le funzioni avanzate, note rappresentate con una scala diatonica internazionale, corrispondenti ai tasti. Infine, di lato rispetto alla fila dei pulsanti, un altro mini display di tre cifre che indica la percentuale di pitch. E’ il momento di entrare nel dettaglio: cerchiamo di giustificare la presenza di tutti questi comandi su un giradischi.

Sezione retro
Sul retro del giradischi, un po’ nascosta, troviamo la sezione POWER/MIDI/OUTPUT/LEVEL (Fig.3). Oltre al tastino di accensione del piatto POWER, subito al suo fianco si trova un ingresso classico MIDI per il collegamento di periferiche esterne, come pedaliere o tastiere. La sezione OUTPUT è il luogo in cui va collegato il cavo RCA per il collegamento al mixer ed uno switch LEVEL che può essere selezionato su PHONO/LINE a seconda del livello di output e delle proprie esigenze.

Sezione inferiore
La parte inferiore del controller è suddivisa in due sezioni:
– Quella di destra che comprende i tasti delle funzioni base: START/STOP per avviare il piatto e fermarlo rapidamente, REVERSE per invertire il senso di marcia del piatto (da orario ad antiorario, con tanto di led rosso ad indicare l’attivazione della funzione), 33/45 rpm per passare dalla modalità 33 giri a quella di 45 giri (il led acceso indica la modalità 33 giri, mentre per passare alla modalità 45 giri dovete trovarvi in modalità PITCH / FADER, altrimenti il led rimarrà acceso e non riuscirete a switchare la funzione), MOTOR OFF per staccare il rotore del piatto lentamente, dando al vinile un effetto slow down.

– Quella di sinistra comprende: il PITCH BEND (uno stick bi-direzionale con alle due estremità il simbolo “b” (bemolle) e “#” (diesis) che in modalità “NOTE MODE” controlla la velocità del piatto di un semitono su con il “#” e di un semitono giù con il “b”, mentre in modalità “PITCH MODE” velocizza il piatto in percentuali tra +/- 1% – +/-3% o +/- 6%), UP per aumentare immediatamente la velocità di rotazione del piatto da 33 rpm +/- 0% ad un’ottava sopra con un pitch del +100%, DOWN per diminuire immediatamente la velocità del piatto da 33 rpm +/- 0% ad un’ottava sotto – 50%, QUARTZ LOCK per annullare le funzioni dei tasti note ed il pitch fader, fissando la velocità a 33rpm. Tutti e tre i tasti hanno un led di colore rosso dedicato, che indica quando la funzione è attiva. In prossimità del piatto, su una parte rialzata, troviamo 8 tasti che variano la percentuale di velocità di rotazione (rpm) del giradischi in base alla nota di riferimento (Fig.5).

Sezione superiore
La sezione superiore è il cuore del controller (Fig.6).

Da lì abbiamo la possibilità di settare, modificare e tenere sotto controllo il comportamento del giradischi e le sue funzioni avanzate. Partendo dall’alto troviamo il PITCH FADER, agendo sul quale possiamo variare la velocità dei giri del piatto in modalità NOTE/FADER (modifichiamo tramite il cursore la percentuale di velocità avendo le note di riferimento) ( Fig.7),

mentre in modalità PITCH/FADER il cursore si comporterà normalmente come un giradischi da dj classico (variando la velocità in percentuale -8/+8). TUNE VOLUME è un trimmer che troviamo alla destra del fader pitch, con il quale è possibile regolare minuziosamente la velocità del piatto tra le note e #, ovviamente in NOTE MODE. Alla sinistra del fader pitch possiamo utilizzare il JOG DIAL (Fig.8) , un knob che ruota a scatti da 1/4 e serve a variare le ottave ed a memorizzare set di note e accordi personalizzati se utilizzato con il MEMORY PITCH illuminato – e quindi attivo.

Schiacciandolo si accede a funzioni avanzate per le note: “GATE”, se si vuole far suonare la nota solo se il bottone viene premuto senza rilasciarlo, “THROUG” se al contrario si vuole far continuare la stessa nota fino alla pressione del bottone o nota successiva. Il display LED a tre cifre ci indica con precisione la percentuale di pitch applicata. Subito a fianco, ecco un duplicato degli 8 tasti che abbiamo trovato prima – di fianco al piatto -, però questa volta in corrispondenza dei tasti troveremo un chiaro display led a 8 cifre che indica le note corrispondenti. Di lato al display NORM/ALL – 8/10/60 troveremo dei led che indicano la percentuale di pitch attiva, che va selezionata tramite il tasto RANGE schiacciato più volte. In prossimità del display c’è un duplicato del pitch bend, con al fianco le funzioni MAJOR/MINOR per selezionare il tipo di scala e OCT DOWN per scendere di ottava, funzioni abbinate al tasto NOTE/PITCH che attiva il tipo di modalità e BUTTON/FADER per variare le note tramite bottoni o agendo sul pitch fader -/+. (Fig.9).

Applicando una pedaliera sull’ingresso MIDI è possibile (attivando la funzione PEDAL-MIDI )(Fig.10) , cambiare, con l’abbassamento o l’alzamento del pedale, le note di un’ottava superiore e inferiore senza agire sui tasti.

Test
Il test è risultato più che soddisfacente. Rispetto ad altri modelli analoghi, il motore a trazione del Vestax potrebbe essere paragonato ad un motore 4×4 di una super car. Ho provato a scratchare a varie velocità, anche a regime lento, ed il piatto si è comportato in maniera affidabile e precisa, con un tasto per lo start/stop di ottima fattura e molto resistente. La delusione forse si presenta sui tasti rimanenti, in particolar modo quelli dedicati al cambio note, che non sembrano progettati per un utilizzo intenso: sarà soltanto una sensazione? Anche in tema di display avrei optato per un cristalli liquidi ampio, fortemente retro illuminato (magari blu), invece che per i vecchi led 7 segmenti che fanno tanto retrò. Per il resto il braccetto è molto preciso e regolabile in ogni sua parte, oltre a donare al controller un design accattivante.

Conclusioni
Il Controller One della Vestax non è un giradischi per tutti. Utilizzarlo comporta molto allenamento ed una tecnica già di buon livello. Sicuramente in mani esperte, utilizzato da turntabilist già in carriera, può risultare un vero e proprio strumento musicale, con un posto già in un’orchestra o in una live band. Ma anche utilizzare il Controller One in uno spettacolo da solista porta questo strumento ad essere visto non più come una periferica passiva ma come un setup capace da solo di creare intrattenimento puro e divertimento assicurato. Il prezzo è un tantino elevato, ma considerando come sempre la qualità dei prodotti Vestax vale la pena di affrontare la spesa. Occhio: sarebbe un peccato utilizzarlo come un semplice giradischi.
Alla prossima Dj Fresella…..
Pro
- Ottima fattura
- Motore di trazione potente e preciso
- Programmabile e personalizzabile
Contro
- Prezzo elevato
- Non facilmente trasportabile
INFORMAZIONI UTILI:
Produttore: Vestax
Modello: Controller ONE
Website: www.vestax.com
Distributore italiano: www.exhibo.it
Costo: circa euro 1.400
Alla prossima,
DJ Fresella
When we talk about record players, or rather about turntables, the first picture that comes to our mind is our trusted Technics 1200: retired for a long time now, we still remember it for its solid and proud design. Nowadays a lot of companies have been developing, starting from this historical model, new projects and turntables, more and more complete, providing them with new functions in spite of the slow decline of the vinyl. The Japanese Vestax house have been thinking about bringing the Turntablism “to the extreme”, giving djs the chance to use the turntable as a real musical instrument.
First impression
Once out of its package, the Vestax Controller One turntable seems to be a little bit generous about its dimensions, in comparison, for example, to a typical Technics turntable. Measuring it in vertical position (which is, in other words, the turntablist position) we get 48 x 37,5 x 12,5 cm. Its design is very modern-looking, with a bright chassis and peculiar embellishments like the mirror arm/base board. The turntable is held by solid feet put at the four sides of the base, adjustable and resistant to stress and vibrations.
Assembly
The components assembly is very simple and fast (Pic.1): you have to locate the plate, fastening it with two screws (indeed provided), and put as pressure as it requires in order to balance the arm where we will put the standard shell with the Vestax logo and the head (not provided)(Pic.1b). In addition to the manual, we will also find in the box a medium length RCA cable to connect the controller to the mixer. Should it not be clear already, even the turntable design helps us understand that this instrument has been made to be used in a vertical stand: by the position of the note keys to the display and the rest of the controls, which we will talk about later.
The turntable
The Vestax Control One turntable, apart from having the same characteristic features of a professional plate for djs, it undeniably offers optional commands which make the difference (Pic.2). The Control One numbers a good 30 buttons, skillfully positioned and with specific function, and, of course, the plate and an innovatively designed (or, at least, futuristic) arm. A large fader/pitch, two mini bidirectional spring sticks, a rotation knob and a mini trimmer. And more, a wide 7 segment pitch backlit led display indicating notes and advanced functions, notes represented in an international diatonic scale, matching each button. Lastly, another three digit mini display which indicates the pitch value, sideways from the button control line. It’s time to get to the detail: let’s motivate the presence of all these controls on a turntable.
Back section
On the back of the turntable we find the POWER/MIDI/OUTPUT/LEVEL section (Pic.3), hidden a little. In addition to the POWER button to start the plate, right on the side there is a standard MIDI input for the connection of external devices, as pedal board or keyboards. The OUTOUT section is where the RCA must be plugged to connect is to a mixer and a switch LEVEL which can be set on PHONO/LINE depending on the output level and one’s own need.
Lower section
The lower part of the controller is divided in two sections:
– The one on the right which includes the basic function buttons: START/STOP to start the late and stop it quickly, REVERSE to play the plate backwards (from clockwise to anticlockwise, complete with a red led to indicate that the function is on), 33/45 rpm to move from the 33 rpm to 45 rpm mode (with the led on indicating that the 33 rpm mode is one, instead, to switch to 45 rpm mode you must switch to PITCH/FADER mode, otherwise the led will stay one and you will not be able to switch the function), MOTOR OFF to cut the plate rotor slowly, giving the vinyl a slow-down effect.
– The one on the left includes: the PITCH BEND (a bidirectional stick that shows the “b” flat and “#” sharp symbols at the two ends – which, in “NOTE MODE” controls the plate speed through the “#” -a semitone up- and “b” -a semitone down-, while in “PITCH MODE” it speeds up the plate within +/- 1% – +/-3% or +/- 6%), UP to immediately increase the rotation speed of the plate from 33 rpm +/- 0% up an octave with a +100% pitch, DOWN to decrease immediately the rotation speed of the plate from 33 rpm +/- 0% down an octave with a – 50% pitch, QUARTZ LOCK to disable the note and pitch fader button functions, setting the speed at 33 rpm. Each one of the three buttons has a dedicated red led, indicating when the function is on. Near the plate, on a lifted side, we find 8 buttons that change the rpm percentage depending on the applied note (Pic.5).
Upper section
The upper section is the controller core (Pic.6).
From there we can set, modify and control the turntable behaviour and its advanced functions. Starting from the top we find the PITCH/FADER, which allows us to change the plate speed in NOTE/FADER mode (modifying, through the cursor, the speed percentage depending on the applied note) (Pic.7),
instead, in PITCH/FADER mode the cursor will act like a standard dj turntable (changing the percentage speed between -8 and +8). TONE VOLUME is a plate trimmer that is on the left of the fader pitch, which allows us to set the table speed thoroughly for the notes and #, indeed in NOTE MODE. On the left of the fader pitch we can use the JOG DIAL (Pic.8), a one-fourth snap-in knob, to change octaves and to record sequences of custom notes and chords when the MEMORY PITCH is lit up – and, therefore, on.
By pushing it we can get to advanced functions for the notes: “GATE”, if we want to play a note only when the button is pushed and held, on the other hand “THROUGH” if we want to let the same note go till we push the button or the following note. The three-digit LED display tells us precisely the applied pitch percentage. Right on the side, there is a copy of the 8 buttons we found earlier – on the side of the plate -, but this time, near the buttons we will find a clear 8 digit led display which indicated the corresponding notes. On the side of the NORM/ALL – ±8/10/60 display we will find some leds to indicate the pitch percentage used, which must be selected through pushing the RANGE button several times. Close to the display there is a copy of the pitch bend, and by its side the MAJOR/MINOR function to select the type of scale and the OCT DOWN function to drop down an octave, NOTE/PITCH combined functions which enables modes and BUTTON/FADER to change key through buttons or working on the -/+ pitch fader (Pic.9).
Connecting a pedal board through the MIDI input it is possible to change (enabling the PEDAL-MIDI function)(Pic.10) notes within a range of two octaves (one up and one down) without using the keys but pushing or letting go of the pedal.
Test
The test result was more than satisfying. Differently from other similar models, this Vestax engine could be compared to a four-wheel-drive engine of a super car. I tried to scratch at different speeds, even at slow running, and the plate behaved reliably and accurately, with a start/stop button of high quality workmanship and very solid. Perhaps the disappointing thing is about the remaining keys, the note change dedicated ones, which don’t seem to have been projected for a strong use: could it be not just a feeling? As for the display too I would have choose a wide lcd, heavily back-lit (perhaps blue), instead of the old 7 segment leds which give an old-fashion touch. As for the rest, the arm is very precise and adjustable in each part, rather than giving the controller a snappy design.
Conclusions
The Vestax Controller One is not a turntable for everyone. Its use implies a lot of practice and an already good technique. Indeed, used by expert hands such as the turntablists’ ones, already experienced, it may be a real musical instrument, with a place in an orchestra or in a live band already. But also using the Controller One in a solo show makes this instrument not to be considered as a passive device anymore but as a setup which definitely is able to entertain and amuse on its own. The price is a little high, but considering the quality of the Vestax products it’s worth the cost. Beware: it would be a pity to use it just as a record player.
Pros
•Excellent workmanship
•A powerful and precise direct drive motor
•Programmable and customizable
Cons
•High price
•Not easy to carry around
USEFUL INFORMATIONS:
Producer: Vestax
Model: Controller ONE
Website: www.vestax.com
Italian distributor: www.exhibo.it
Price: about 1.400 Euros
Until next time Dj Fresella…..
Italian to English translation: Umberto del Giudice