


![]()
Date le informazioni che abbondano in rete, diventa anacronistico parlare del LaunchPad come di una macchina nuova. Pertanto, per redigere questo articolo, l’approccio allo strumento è stato condotto volutamente in modo empirico, dettato dall’esigenza di capire se il nuovo strumento firmato Novation – espressamente dedicato ad Ableton Live e che ha destato molto interesse già prima della sua introduzione sul mercato – avesse, nascosta da qualche parte del suo OS, ancora qualche freccia al proprio arco nell’uso con altri software musicali.

Installazione
Anche se il LaunchPad viene riconosciuto in automatico dal sistema operativo, non altrettanto immediato è il riconoscimento da parte di Ableton Live: per questo motivo, in prima battuta, consiglio di scaricare dal sito Novation i driver più aggiornati ed avviarne l’installazione. Fatto ciò, si può procedere all’apertura di Live dove andranno settati l’I/O nelle Preferenze al tab “MIDI Sync” (Fig.1). Ad ogni successivo avvio, Live riconoscerà in automatico la connessione al LaunchPad.

Bundle Software
Prima di addentrarci nell’uso diretto del LaunchPad è bene sottolineare da subito che lo strumento è corredato da una versione Lite di Ableton Live. Chi è abituato a lavorare sostanzialmente con Groove Audio non troverà di che recriminare su questa versione “alleggerita” del programma. Ovviamente mancheranno l’arsenale audio e parte degli strumenti virtuali offerti con la versione Studio, ma considerando il costo finale dell’intero prodotto non posso che ricordare che “a caval donato …”. Chi ha già installato la versione completa di Live, come il sottoscritto, farà bene invece a non incasinare il proprio HD, anche se su MAC le due versioni possono tranquillamente convivere senza creare problemi.
E adesso… divertiamoci!
Il titolo la dice lunga sul fatto che il LaunchPad è immediato nell’utilizzo già dal primo approccio con Ableton Live. Lo scarnissimo manuale in PDF a corredo (solo 3 facciate) consente l’uso pressoché immediato dello strumento anche ai meno preparati in materia di controller. Doverosa indicazione: la prima fila orizzontale del LaunchPad richiama le modalità operative (di default il LaunchPad si autoimposta per la gestione delle clip con l’area centrale funzionante come Pad), l’area centrale e la fila verticale sulla destra, in base alla modalità operativa richiamata, assumono sia funzioni di richiamo di uno specifico Control Change, sia funzione di variazione numerica della modalità operativa attivata. Caricata qualsiasi session nel programma, il LaunchPad ne visualizzerà immediatamente la disposizione delle “clip” sui suoi 64 Pad che coprono l’area centrale del controller, con una matrice di otto tracce orizzontali per otto clip verticali. Casomai avessimo bisogno di controllare più di otto tracce, ovvero otto clips, le quattro frecce disposte nella parte alta a sinistra del controller ci consentono di scorrere in tutta l’area di Live con estrema semplicità e velocità. Ad ogni spostamento dell’area di Live, i Pad si adatteranno di conseguenza, dando sempre una visualizzazione chiara ed immediata di dove agire: ottimo. In questa modalità, settata di default all’avvio dello strumento, ma richiamabile in qualsiasi momento con il pulsante “Session” (qualora si cambiasse pagina operativa) , gli otto Pad verticali posti in verticale sulla destra operano la funzione di richiamo delle scene, auto settandosi, in senso verticale, man mano che ci si sposta nell’area operativa di Live. Gli stessi otto Pad assumono le funzioni indicate dalle serigrafie verdi, nel momento in cui si preme l’ottavo Pad “Mixer” della fila orizzontale. In tal caso, i Pad consentono di attivare alcune delle funzioni cardine del programma, mentre i 64 Pad operano le variazioni della funzione richiamata. Nello specifico, una prima modalità divide l’area centrale in due distinte zone operative, laddove le prime quattro file continuano la loro azione sulle clips, mentre le quattro file inferiori operano per ogni canale audio di Live, lo Stop delle clips, il Mute, il Solo e la messa in record (Arm). In questo caso, la fila di destra opera su tutte le tracce la stessa funzione, disattivandole. Diversamente, i primi 4 Pad di destra richiamano il controllo del Volume, Pan e Mandate ausiliarie del canale A&B. In questo caso i 64 Pad centrali assumono colorazione differente a seconda della funzione richiamata e ne variano i valori su otto valori fissi. Se, da un lato, ciò consente un rapido richiamo del valore desiderato con salti che variano a seconda della funzione richiamata (indicativamente 16 valori MIDI per ogni Pad adiacente), dall’altro ne rappresenta anche il limite più evidente qualora si volesse agire sulla scala completa dei 128 valori MIDI che, già di per sé, sono limitanti in alcuni contesti produttivi. C’è da dire, tuttavia, che essendo il LaunchPad pensato soprattutto per l’utilizzo dal vivo, gli 8 valori fissi valutati all’atto pratico risultano essere più che comodi per una performance live. Infine, i pulsanti operativi “User 1” e “User 2” consentono all’utente di poter programmare in proprio le funzionalità dell’area centrale che di default, lasciando le cose come stanno, fungono da Pad percussivi per i drum kit di Live. In questa modalità, mi avrebbe fatto piacere riscontrare la possibilità di avere i Pad dinamici, in modo da poter dosare l’azione percussiva sui suoni.
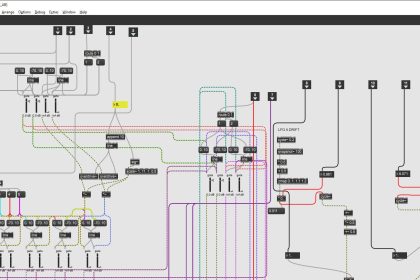
Altri Software
 Ho premesso all’inizio che l’intento di questo test era indirizzato a capire se il LaunchPad potesse essere utilizzato anche in altri contesti operativi. Per far ciò, innanzitutto, ho dovuto scaricare dal sito Novation il software AutoMap nella versione più aggiornata (3.41) con il quale ho tentato di “accoppiare” il LaunchPad a Logic 9, software che uso abitudinariamente per le mie piccole produzioni audio. Ebbene, andando più in fondo nello studio di AutoMap ho scoperto che lo stesso è stato sviluppato con un occhio di riguardo alla serie SL e Nocturn, relegando il LaunchPad ad una sorta di Cenerentola della situazione. Con tale affermazione, intendo indicare il fatto che chi spera, come me, di poter usare il LaunchPad anche nella semplice veste di drum controller, pone male le proprie speranze. Anche la relativa semplicità di associare, tramite apposita pagina di programmazione di AutoMap, le note MIDI ai Pad del LaunchPad, non sempre restituisce quel feeling operativo tale da pensarlo come sostituto di un normale master controller. Ad ogni modo: con Ultrabeat, una volta impostate le 24 note MIDI, è stato un gioco da ragazzi programmare qualsiasi pattern ritmico. Con MOTU BPM, invece, c’è stata qualche difficoltà in più, dato che i 4 layer su cui sono disposti i 16 Pad percussivi rispondono, di fatto, alle stesse note ma con canali MIDI differenti, consentendo, pertanto, il controllo di un solo layer alla volta. Tale limite, tuttavia lo si avrebbe anche con un qualsiasi altro controller che opera su un solo canale MIDI alla volta. Un modo di aggirare parzialmente tale limite si ottiene operando direttamente sul BPM, attivando la funzione “Route MIDI Input to” e lasciando settata la voce adiacente su “Selected Bank&Part” (Fig. 2). Con Battery di Native Instrument, l’operatività è la stessa di Ultrabeat. Una volta settati tutti i Pad e caricato un set percussivo, ci si può sbizzarrire come meglio si crede nella costruzione dei propri pattern. Anche se non ho avuto modo di provare il LaunchPad su tutto lo scibile delle Drum machine virtuali (XLN Audio, GURU, iDrum, giusto per citarne alcune), il sistema rimane invariato: bastano un pò di pazienza e conoscenza minima delle note MIDI da assegnare. Una nota di merito per il LaunchPad e l’AutoMap va riconosciuta alla possibilità di assegnare a Pad differenti la stessa nota MIDI, cosa non possibile invece sulle tastiere, dove le assegnazioni sono fisse e, di solito, conformi in modo statico al General MIDI (GM Standard). Ciò ad esempio torna molto utile per creare un pattern di HiHat, dove la dislocazione su più Pad ne consente una più comoda e rapida programmazione.
Considerazioni finali
Per chi usa Ableton Live per le proprie produzioni o le proprie performance dal vivo, il LaunchPad rappresenta un must-controller dall’ottimo rapporto qualità-prezzo. Le piccole defezioni riscontrate (Pad non dinamici, valori di Control Change limitati) non penalizzano pesantemente la creatività; anzi, considerando che Live è un programma votato alla velocità operativa, il LaunchPad non fa altro che incrementarla. Non altrettanto convincente è l’uso nei confronti di altri plug-in o altre DAW, dove la la necessaria assegnazione dei Pad potrebbe scoraggiare più di un utente… Ancor più se si considera la mancanza di potenziometri e slider per il controllo di funzioni continue. Ma chi cerca tale confort, può tranquillamente indirizzarsi alle serie SL o Nocturn, che ad ogni aggiornamento di AutoMap allargano i propri orizzonti operativi alle DAW più recenti, con la peculiarità, unica per i controller, di auto-mapparsi su qualsivoglia parametro operativo del sequencer e dei suoi plug-in proprietari. Ritornando al LaunchPad, la possibilità di suonare fino a 64 suoni percussivi contemporaneamente velocizza notevolmente la costruzione dei pattern ritmici, qualunque sia il sequencer usato, a patto però che si perda un pò di tempo per la configurazione della propria drum machine preferita. Non va dimenticato nemmeno il prezzo, tra i più bassi per questo tipo di controller. Un consiglio: se andate a provarlo in negozio, cercate di avere con voi anche abbastanza soldi per portarvelo a casa. La tentazione è forte.
INFORMAZIONI UTILI:
Produttore: Novation
Modello: Launchpad
Website: www. novationmusic.com
Distributore: www.midiware.com
Prezzo: Euro 179 + IVA![]()
Since there is already so much information about it on the web, talking about the Lauchpad as a new device may sound anachronistic. Therefore, as for writing down this article, the approach to this instrument has been deliberately conducted in an practical way, dictated by the need of understanding whether the new product by Novation – specifically dedicated to Ableton Live and arousing a lot of attention long before its launch on the market – still had, somewhere hidden inside its OS, more than one string to its bow in terms of use with other music software.
Installation
Even though the LauchPad is automatically recognized by the operating system, the same immediacy doesn’t occur with Ableton Live: for this reason, as a first step, I suggest you to download the latest drivers from the Novation website and start their installation. Once done, you can go on and open Live where you have to set the I/O within Preferences at the “MIDI Sync” tab. (Pic.1). From then on, Live will automatically recognize the connection to the LaunchPad every time you run it.
Bundle Software
Before going into detail about the direct use of the LaunchPad it’s good to point out right from the start that the instrument comes with the Lite version for the Ableton Live. Those who are basically used to work with Groove Audio won’t have anything to complain for about this “lightened” version of the program. Of course the audio arsenal and some parts of the virtual instruments coming with the Studio version will be missing, but considering the actual price of the full product I can’t do anything but remembering that one should not look a gift horse … .Those who have already installed the complete version of Live, as I have, would better not mess their own HD instead, even if the two versions can easily coexist causing no problems.
And now… Let’s have some fun!
The title says a lot about the fact that the LaunchPad works immediately, right from the first approach with Ableton Live. The PDF manual that comes with it (very poor, just three pages) allows us to use this instrument straight away, even for those who are not into controllers. Necessary information: the first raw across of the LaunchPad controls operating modes (by default the Launchpad mapping will auto-set with the middle area working as a Pad), the middle area and the right-hand vertical row, depending on the mode we’ve chosen, function both for working on a specific Control Change and on varying the number of operating modes we’ve enabled. Loading whatever session into the program, the Launchpad will immediately show up the disposition of the clips on its 64 pads throughout the middle area of the controller, with a matrix made of eight horizontal tracks by eight vertical clips. If we ever need to control more than eight tracks, i.e. eight clips, the four arrows which are on top of the left-hand side of the controller allow us to run through all the Live area very easily and quickly. With every move on the Live area, the pads will behave according to them, showing us a clear and immediate image about what to do: excellent! For this mode, set by default as the instrument boots, as well as possible to control at any time by the “Session” button (in case of operating page change), the eight upright pads on the right-hand side, work as launching scenes, auto-setting themselves in a vertical way, as you move within the operating area in Live. The same eight pads will adjust themselves as the green silkscreen graphics indicate, when you press the eighth pad “Mixer” on the raw across. In this case, pads allow to enable some of the main functions of the program, while the 64 pads work on varying the recalling function. Specifically, a first mode cuts the middle area in two distinct sets, where the first four rows keep on working on the clips, and the four lower rows work on every audio channel for Live, the clip Stop, the Mute, the Solo and the Arm (recording process). In this case, the right-hand row works on all the tracks with the same function, disabling them. On the contrary, the first 4 middle pads recall the control of Volume, Pan and auxiliary sends of the A&B channel. In this case the 64 middle pads light up in different colors depending on the recalled function changing their color according to eight fixed values. While on the one hand this allows a quick recall of the value with jumps that may vary depending on the recalled function (approximately 16 MIDI values for each adjacent pad), on the other hand it may also represent the main limit should we want to work on the 128 MIDI full scale values which, by themselves, can be limiting within some production contexts. However, it must be said, being the LaunchPad aimed to a live use, the eight fixed values, from a practical point of view, can be considered more than useful for a live performance. Finally, the operating buttons “User 1” and “User 2” allow the user to program by himself the functions on the middle area which by default, leaving things as they are, work as percussive pads for the drum kit in Live. In this mode, I would have rather liked to get the chance to have the dynamic pads, so to be able to adjust the percussive action on the sounds.
Pic.2 – “ Route MIDI Input to ”
Other Software
By way of introduction, I said earlier that the reason for this test was aimed to understand whether the Launchpad can be used in some other operating contexts as well. Therefore, first of all, I had to download the latest version (3.41) of the AutoMap software from the Novation website by which I tried to “match” the LaunchPad to the Logic 9, which is the software I use every time for my little audio productions. Well, getting into detail about AutoMap I discovered that it has been developed with a special care for the SL and Nocturn series, banishing the LaunchPad as some sort of Cinderella of the day. What I really mean, by saying so, is that those who hope, as I do, to be able to use the LaunchPad also as a simple drum controller, will be disappointed. The relatively ease about matching the MIDI notes to the pads of the LaunchPad, through the provided AutoMap control page, doesn’t always give such results that can make one think about it as a substitute for a standard master controller. However: with Ultrabeat, after setting the 24 MIDI notes, programming whichever pattern has been a piece of cake. With MOTU BPM, instead, it’s a little bit more difficult, since the 4 layers, which include the 16 percussion pads, actually deal with the same notes but with different MIDI channel, allowing, that way, to control one layer at a time. This limitation, by the way, would be also found with any other controller that works on a single MIDI channel at a time. One way to partially bypass this restriction is controlling the BPM directly. Enabling the “Route MIDI Input to” function and leaving “Selected Bank&Part” in the adjacent drop-down list. (Pic. 2). With Battery by Native Instrument, the setting procedure is the same as with Ultrabeat. Once all the pads have been set and launched a percussion set, we can really have fun building patterns as we like. Though I wasn’t able to try the LaunchPad on anything there is to know about the virtual Drum machines (XLN Audio, GURU, iDrum, just to mention a few), measures don’t change: it only takes a little patience and a minimum knowledge about the assignable MIDI notes. Some credit must be given to the LaunchPad and to the AutoMap about the opportunity to assign the same MIDI note to different pads, which is not possible on keyboards, where it’s all fixed and, usually, conform to the General MIDI standard in a static way. For instance, this turns out to be very useful in creating HiHat patterns, where an easier setting is allowed by the assignable function on more than one pad.
Concluding Considerations
For those who work with Ableton Live for their music production or for their live performances, the LauchPad represents a must-have controller for its price-quality ratio. The short amount of restriction (non-dynamic pads, limited Control Change value) does not affect creativity that much; rather, considering that Live is software aimed to a quick use, the LaunchPad simply makes it even quicker. Its use with other plug-ins or other DAWs is not as much convincing, where it’s necessary to assign pads could discourage more than one user…Even worse if you think about the lack of knobs and sliders to control the functions continuously. Those who need that kind of comfort can easily head towards the SL or Nocturn series, which at any AutoMap updates widen their operative horizons towards the latest DAWs, with the unique peculiarity for controllers to automap on whichever parameter about the sequencer and its proprietary plugins. Back to the LaunchPad, the possibility to play up to 64 percussive sounds at the same time really speeds up the building process of electronic patterns, no matter what sequencer is involved, but as long as you spend some time on setting your favorite drum machine. Not to forget its price either, one of the lowest among this kind of controllers. One suggestion: If you go and try it in a shop, be sure to carry enough money with you to bring it home. It’s so easy to fall into temptation.
USEFUL INFORMATIONS:
Producer: Novation
Model: Launchpad
Website: www. novationmusic.com
Distributor: www.midiware.com
Price: 179,00 Euros (VAT excluded)
Italian to English translation: Umberto del Giudice