
Animoog è un app della Moog Music Inc. e spendere anche solo una parola in più su chi l’ha realizzata, sarebbe superfluo. Ci concentreremo soltanto ed esclusivamente sulle caratteristiche di uno degli ultimi prodotti di casa Moog. Nel corso dei nostri test, cercheremo di capire se Animoog è un software di nicchia, dedicato ai più smaliziati appassionati di sintesi, oppure un prodotto creativo da un punto di vista sonoro.

Una sintesi sonora innovativa
Animoog è un sintetizzatore per device Apple. Non si propone come emulazione di prodotti hardware esistenti. È un synth esclusivamente software, sviluppato in casa Moog, appositamente per iPad/iPhone.
La tecnica di sintesi sonora utilizzata da Animoog è basata sul concetto di Anisotropia.Questa tecnica è stata denominata ASE (Anisotropic Synth Engine). In maniera sintetica ed efficace, Moog definisce la sintesi sonora anisotropa come una animazione dinamica di forme d’onda che avviene lungo un percorso definito all’interno di una griglia x/y.
In realtà la Anisotropic Synth Engine introdotta da Moog può essere considerata come l’evoluzione di una precedente tecnica di sintesi sonora a vettori, detta appunto Vector Synthesis, introdotta verso fine degli anni ’80 da Sequential Circuits.
La griglia x/y di Animoog: 16 forme d’onda e 8 timbri
Per comprendere le basi della Anisotropic Synth Engine, consideriamo lo spazio individuato da una coppia di assi cartesiani x/y, immaginiamo di disegnare un percorso al suo interno, ed infine di suonare la tastiera di un sintetizzatore. Le note percorreranno la traccia disegnata e subiranno un percorso di modulazione sonora definito dalla composizione della griglia x/y. Questo è esattamente ciò che avviene suonando Animoog.
In Animoog lo spazio x/y è una griglia quadratica regolare 16×8 composta da 8 timbri (asse y), e 16 forme d’onda (asse x). Sviluppandosi all’interno di uno spazio x/y così composto, il suono generato da Animoog è un vettore di tipo polifonico.

Gli 8 timbri, e quindi la componente y del vettore polifonico, vengono selezionati dall’utente a partire da un elenco di 57 timbri derivati da classici sintetizzatori Moog quali Voyager, Little Phatty, MF-103 12 Stage Phaser, MF-105 MURF, e altri ancora.
Ognuno degli 8 timbri può essere statico e quindi contenere un unica forma d’onda, oppure dinamico e contenere fino ad un massimo di 16 forme d’onda. L’evoluzione delle forme d’onda costituisce la componente x del vettore polifonico.
La qualità audio dei timbri è veramente di altissimo livello. Sicuramente ciò che influisce negativamente sull’audio di Animoog, sono gli evidenti limiti dell’uscita jack dell’iPad. Affiancando ad Animoog una scheda audio di buona qualità, la corposità di alcuni timbri rende difficile, in un mix, la distinzione tra il suono di un Little Phatty e un iPad.
La griglia x/y di Animoog: il moto lungo il percorso
Il vettore polifonico viene rappresentato sulla griglia x/y dal moto di un cursore colorato lungo il percorso tracciato (ogni nota generata è un cursore con colore differente). Il suono prodotto dal sintetizzatore sarà quindi una combinazione di timbri e forme d’onda, che evolve lungo il percorso tracciato.

Le sonorità generate con questa metodologia vengono ulteriormente arricchite da una tradizionale architettura di sintesi in stile Moog costituita da filtri ladder e overdrive.
Questa architettura permette di dosare sia alcuni parametri di sintesi più tradizionale quali cutoff, resonance, delay, thick, sia alcuni parametri che influenzano in maniera più diretta il moto lungo il percorso, quali orbit, path e rate.
Va precisato che ogni percorso è ancorato ad un piccolo cerchio verde all’interno della griglia x/y. Tramite quest’ancora possiamo spostare il percorso in diverse posizioni all’interno della griglia, ottenendo quindi, a parità di percorso, nuove combinazioni di timbri e forme d’onda.
Questo è uno degli aspetti più caratterizzanti di Animoog e consente di rendere le nostre performance estremamente dinamiche. Le sonorità possono evolvere in maniera molto fluida, semplicemente trascinando il piccolo cerchio verde con una mando all’interno della griglia, e suonando la tastiera con l’altra.
Come si presenta Animoog
Evitando di descrivere con un dettaglio eccessivo ogni singolo menù, sotto-menù, knob e interruttore di Animoog, non avendo infatti questa breve recensione intenzioni di sostituire l’ottimo manuale d’istruzioni (disponibile sul sito Moog e all’interno dell’app), ci limitiamo a fornire le linee guida per la configurazione e la modulazione della sintesi sonora anisotropa.
Ai fini di una più chiara descrizione, scomponiamo la finestra di Animoog in 3 sotto sezioni:
 A. Sezione Monitor, costituita da una serie di tab, il cui contenuto sarà visibile sullo schermo principale di Animoog. Inferiormente allo schermo sono presenti i menù relativi alla gestione dei preset e alla gestione del tempo (Bpm).
B. Sezione Moduli, due slot a scorrimento costituiti da moduli ricchi di knob e parametri per la configurazione della modulazione sonora.
C. Sezione Tastiera, contenete la tastiera ed alcuni menù per la sua gestione.
A. Sezione Monitor
Ad ogni avvio Animoog carica il preset di default, e mostra il contenuto della prima delle tab che si trovano nella porzione superiore. Attraverso la pressione sul nome di ogni tab, ne verrà mostrato il relativo contenuto.

X/Y Pad
Rappresenta la finestra principale di Animoog ed è costituita dalla griglia di 8 timbri e 16 forme d’onda. Le note generate dalla tastiera sono rappresentate da cursori colorati che seguono il percorso tracciato al suo interno.
La tipologia di movimento dei cursori lungo il percorso può essere definita dai moduli Path e Orbit presenti in due slot di knob posti nella sezione B (Moduli).
Ulteriore caratteristica dell’X/Y Pad, è la presenza di un oscilloscopio sovrapposto alla griglia che mostra le evoluzioni delle forme d’onda a seconda delle modulazioni e del percorso tracciato.
Timbres
È il menù che consente di selezionare, tra un elenco di 57 timbri (56 + 1 timbro muto definito Silence), gli 8 che costituiscono la componente y del vettore polifonico e che di fatto, costituiscono gli oscillatori della sintesi sonora anisotropa di Moog. All’elenco degli 8 timbri corrispondono, dall’alto verso il basso, le 8 celle verticali dell’X/Y Pad. In questo menù è possibile ascoltare una preview di ogni singolo timbro.
 Per modificare la componente y del vettore polifonico basta trascinare uno degli 8 timbri in una posizione differente, oppure sostituirlo selezionandone uno differente nell’elenco.
Ciò che a mio avviso manca in questo menù, è un riscontro immediato delle forme d’onda di ogni timbro. In fase di configurazione della sintesi sonora anisotropa, è possibile quindi interagire solo con la componente y del vettore polifonico. È possibile scegliere il timbro, ma non sapere se contiene una o più forme d’onda. Le uniche possibilità per avere un riscontro di questo tipo sono: sperare che il nome del timbro possa fornirci qualche indicazione; ascoltare la preview del timbro; spostarsi nella tab X/Y Pad e osservare l’oscilloscopio.
Env/Mod
In questo menù è possibile definire le curve degli inviluppi per AMP (ampiezza), FILTER (filtro), MOD (modulazioni). Cliccando su ogni singola curva è possibile ottenere un suo ingrandimento per un disegno più accurato delle fasi di attack, decay, sustain e release.
Alla destra degli inviluppi troviamo i parametri per la gestione dell’LFO (Rate, Sync, Shape, KB Trig), che costituisce una delle possibili sorgenti di modulazione.
Nella prozione inferiore all’LFO, sono presenti 4 slot di modulazione, ognuno dei quali consta di 3 sezioni:

- Source – (OFF, LFO, MOD, X-Psition, Y-Position) è la sorgente della modulazione. Quando la Source è impostata su OFF, la sezione Control diventa la sorgente della modulazione. È dotata di un konbb di Amount bipolare (-100, 0, +100).
- Control – può essere la sorgente della modulazione se Source è impostato su OFF, oppure essere uno strumento di controllo della Source selezionata, attraverso il parametro di Control selezionato (OFF, Poly Pressure, Chan Pressure, Velocity, Key Pitch, Mod Wheel, Pitch Bend). Come per la Source, è dotato di un konbb di Amount bipolare (-100, 0, +100).
- Destination – è il parametro oggetto della modulazione (OFF, Filter Freq., Filter Res., Filter Amnt, Filter Drive, Orbit Rate, Orbit X Amnt, Orbit Y Amnt, Path Rate, Path Origin, LFO Rate, LFO Shape, Thick Detune, Pithc 1 Semitone, Pitch 5 Semitone).
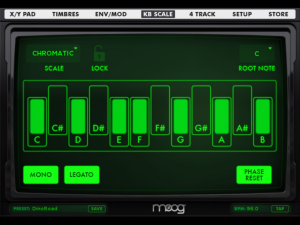
KB-Scale
Questo menù permette di selezionare la Root Note e la Scale della tastiera .Quest’ultima può essere selezionata da un elenco (chromatic, ionian, dorian etc.), o personalizzata a discrezione dell’utente selezionando/deselezionando i tasti da rendere attivi/disattivi.
Nel menù sono presenti anche i controlli per la gestione delle voci (1 o 4): Mono, Legato, Phase Reset. Il tasto Legato ha effetto solo se il tasto Mono è attivo.
Con entrambi i tasti Mono e Legato attivi, la voce viene riattivata quando vengono suonate note distaccate; la voce non viene riattivata quando vengono suonate note sovrapposte. La funzione di Glide si attiva con la sovrapposizione di note adiacenti e non.
Con il tasto Mono attivo e il tasto Legato disattivo, ogni nuova nota suonata genera nuove voci. La funzione di Glide è attiva solo per note adiacenti.
Con il tasto Phase Reset attivo, gli oscillatori ASE generano fasi identiche ad ogni nuova nota suonata.
Setup
In questa tab sono presenti alcune impostazioni di carattere generale:
-
- Midi – impostazioni per le connessioni midi (wifi o usb). A tal proposito è opportuno ricordare che di default possono essere utilizzati solo messaggi midi in, la funzione di midi out è invece attivabile esclusivamente mediante l’acquisto di appositi Expansion Pack. Sono presenti anche un tasto Refresh, per aggiornare l’elenco delle connessioni midi disponibili; un tasto Panic, per inviare messaggi All Note Off (nel caso di note “incantate”).

- Presets – consente l’Import/Export dei preset tramite iTunes, offre anche la possibilità di creare New Preset, o Random Preset, (completamente casuali nella composizione di tutti i parametri), e di elimiare preset esistenti con la funzione Delete Preset.
- Configuration – contiene impostazioni per la gestione del display quali attivare/disattivare la Pithc Bend, la Modulation Wheel, e l’oscilloscopio sovrapposto alla griglia; ma anche impostazioni per la gestione dell’audio in background (molto utile se si lavora con più app musicali).
- Manual – permette di consultare il manuale di Animoog.
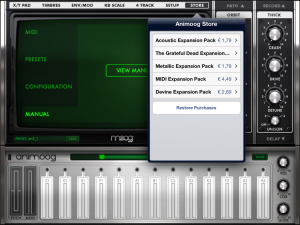
Store
Cliccando su questa tab si accede ad un sotto menù che permette di scaricare contenuti aggiuntivi a pagamento. Gli Expansion Pack possono comprendere sia set di timbri aggiuntivi, sia implementazioni midi.
Per l’acquisto di uno qualunque degli expansion pack, è richiesta una versione di Animoog aggiornata all’ultima release.
Preset, Bpm, Tap
Nella porzione inferiore della sezione monitor, troviamo un menù per richiamare i Preset (combinazioni di timbri e forme d’onda) creati da Moog, e accorpati in gruppi: Bass, Efx, Hits, Keys, Leads, Pads,Plucked, User.
I preset possono essere modificati e salvati con un nuovo nome, all’interno del gruppo User.
Di lato al menù dei preset, troviamo il Bpm monitor e il relativo TAP button che permettono di stabilire il tempo di esecuzione, al quale sincronizzare i parametri della modulazione sonora.

B. Sezione Moduli
Alla destra della sezione Monitor troviamo due slot a scorrimento contenenti 3 moduli ciascuno, che gestiscono svariati parametri di sintesi.
Dei 6 moduli totali, ne sono visibili 2 per volta, uno per ogni slot. Attraverso la pressione delle frecce a monte e a valle dei moduli visualizzati, è possibile far scorrere gli slot per visualizzare i moduli successivi.
Nello slot di sinistra troviamo i moduli Filter, Path, Orbit; in quello di destra troviamo i moduli Delay, Thick, Recorder.

Filter (slot di sinistra)
Si tratta di un filtro risonante che può essere impostato come LP (passa basso), BP (passa banda), HP (passa alto). Influenza l’Anisotropic Synth Engine amplificando, attenuando, o lasciando passare le frequenze stabilite. Consente di regolare: Drive (livello delle frequenze pre-filtrate), Env (controllo bipolare della modulazione dell’inviluppo del filtro), Frequency (frequeza di taglio), Res. (risonanza attorno al valore della frequenza di taglio).
Orbit (slot di sinistra)
È un oscillatore di bassa frequenza che influisce sulla natura del vettore polifonico, e quindi sulle voci di Animoog, modulando la posizione dei cursori colorati durante il loro moto.
Valori crescenti di X Amount e Y Amount fanno compiere ai cursori dei movimenti ad orbita lungo i percorsi tracciati. Il valore di Rate determina la velocità con la quale i cursori compiono le orbite. La funzione di Sync sincronizza il tempo di Rate al tempo indicato nel Bpm monitor in termini di suoi divisori o multipli.
Path (slot di sinistra)
È il modulo che consente di tracciare il percorso che i cursori colorati seguiranno all’interno della griglia x/y.
L’interruttore Edit abilita/disabilita la fase di disegno del percorso (da 1 ad un massimo di 14 linee connesse da un massimo di 15 punti). L’interruttore Clear cancella i percorsi. Il selettore Mode permette di scegliere il comportamento dei cursori lungo il percorso (Loop, Back/Forth, Once). Il valore di Rate stabilisce con che velocità i cursori percorreranno il percorso. L’interruttore Sync consente di sincronizzare il tempo di Rate con il tempo indicato nel Bpm monitor in termini di suoi divisori o multipli.
Thick (slot di destra)
Questo modulo controlla e permette di dosare i seguenti parametri:
- Crush – aggiunge effetti di distorsione.
- Drive – aggiunge effetti di saturazione.
- Detune – gestisce l’offset e il pan di 2 o 4 voci selezionate attraverso l’interruttore Unison.
Delay (slot di destra)
Modulo di gestione del delay che consente di regolare il Mix, quindi l’equilibrio tra il segnale originale e quello ritardato; il Feedback, quindi la quantità di segnale mixato che ritorna come input del delay; il Time, quindi il tempo di ritardo; il Sync, quindi la sincronizzazione del valore di Time con il tempo indicato nel Bpm monitor in termini di suoi divisori o multipli.
Record (slot di destra)
È un modulo di registrazione virtuale. Consente la registrazione di performance, anche su più livelli.
È dotato di un interruttore Play/Stop, che consente di ascoltare e arrestare la registrazione effettuata; un interruttore Record, che avvia nuove registrazioni; un interruttore di Overdub, che, se attivato, consente di registrare nuovi livelli audio sulla stessa performance; due interruttori Buffer (copy e paste) per il salvataggio delle performance come file .wav e la loro gestione; un interruttore Clear, che elimina l’ultima registrazione nel Buffer.
Contrariamente a quanto si possa pensare, il grado di precisione con il quale si riescono a controllare i knob dei vari moduli, non è assolutamente da sottovalutare.
Toccando un knob si può spostare il dito verso l’alto e il basso lungo tutta l’altezza dell’iPad per fargli compiere un giro completo. Non è necessario dunque compiere con il dito un movimento circolare. La stessa situazione si verifica anche quando si utilizzano più dita su più knob differenti.
Fino a quando non perde il contatto con lo schermo dell’iPad, uno dito controllerà sempre lo stesso knob.
C. Sezione Tastiera
Nella porzione superiore della sezione troviamo uno Slider verde che permette di interagire con le dimensioni e il range della Tastiera.
Spostare verso destra o sinistra la posizione dello slider, significa cambiare la posizione della tastiera rispetto alla ottave. Allungare o restringere lo slider significa ridimensionare la tastiera aumentandone o diminuendone il numero dei tasti visibili.
La superficie di ogni tasto funge da controller verticale, dotato di indicatore luminoso, da utilizzare come Control nei 4 slot di modulazione della tab Env/Mod.
Sulla porzione sinistra della tastiera troviamo i controlli per Pitch Bend e Modulation Wheel, anch’essi dotati di indicatore luminoso proporzionale al valore dei controlli. I due controlli possono essere attivati o disattivati attraverso la tab Setup.
Sulla porzione destra della tastiera troviamo i knob che regolano:

- Volume master;
- Cor, correzione del Pitch;
- Glide, controllo del portamento.
Animoog V2 – aggiornamento all’ultima versione (2.0.0)
Con l’ultimo aggiornamento, rilasciato il 20/12/12, Moog ha arricchito ulteriormente Animoog, rendendolo uno strumento ancora più performante. Verranno di seguito illustrate le novità dell’ultimo aggiornamento, prendendo in considerazioni le 3 sezioni A,B,C.
A. Sezione Monitor
In questa sezione sono state implementate alcune funzioni nelle tab Env/Mod, KB Scale, e Setup. È stata inoltre introdotta una nuova tab: 4 Track.
Env/Mod
In questa tab sono state aggiunte alcune interessantissime funzioni ai 4 slot di modulazione. Nel parametro Control troviamo infatti le seguenti nuove voci: accel-x, accel-y, accel-z. È possibile dunque utilizzare l’accelerometro dell’iPad come controllo della modulation.

Tra i test realizzati, controllare i parametri Y-Amount e X Amonunt del modulo Orbit rispettivamente con accel-y e accel-x, è stato tra i più entusiasmanti. Muovere ed orientare l’iPad nello spazio per controllare l’orbita dei cursori lungo il percorso, da l’impressione di avere tra le mani e poter muovere le note generate dall’Animoog.
Per arricchire questa configurazione, suggerisco di aggiungere il controllo del Thick Detune attraverso il parametro accel-z, movendo quindi l’iPad verso l’alto e il basso.
KB Scale
In questa tab è sata aggiunta una funzione di keyboard Lock, per preservare le impostazioni di scala dei preset salvati, evitando modifiche accidentali.
Setup
Alla voce Midi di questa tab è stato aggiunto un tasto per definire il Range del Pitch Bend, e un tasto Map CCs che consente di mappare, con messaggi CC, tutti i knob e i controlli di Animoog. È inoltre possibile di salvare/caricare le mappature esistenti attraverso il tasto Save/Load CC Map.

Quest’implementazione può rilevarsi estremamente utile. Permette di mappare Animoog con un controller midi, e quindi utilizzare knob reali. Si può ottenere una gestione dei parametri, presenti nei due slot a scorrimento, sicuramente più precisa rispetto a quanto potremmo ottenere con la superficie dell’iPad.
Inoltre, mappando tutti i knob di Animoog, è possibile controllare contemporaneamente parametri che appartengono ad uno stesso slot, e dovrebbero quindi, essere gestiti indipendentemente. Senza un controller opportunamente mappato non sarebbe possibile ad esempio, gestire contemporaneamente Frequency e Orbit-Rate in quanto appartengono entrambi allo slot di sinistra.
Controllare il filtro e le orbite di Animoog con dei veri knob Moog (ad esempio quelli di un Little Phatty) è stata una fantastica esperienza che suggerisco di provare.
4 Track
Questa tab apre un sequencer multitraccia (massimo 4 tracce). Consente la creazione di progetti musicali in cui registrare il risultato della riproduzione e della modulazione. Avviata la registrazione, è infatti possibile tornare nella finestra dell’ X/Y Pad. La Tab 4 Track offre:

- comandi di transpose quali Play, Pause, Stop, Rec, Back;
- comandi di Loopl, Mute, Solo, Arm, Volume su ogni singola traccia;
- gestione del Volume master;
- gestione del Metronome;
- Cut, Copy, Split, Loop, Color di ogni singola clip registrata;
- Load Clip (dalla libreria dell’iPad), Paste Clip (da altre tracce), Clear Track;
- gestione dei Project di registrazione;
- compatibilità con il protocollo AudioCopy/Paste.
Allo stato attuale è da intendersi solo come strumento dove registrare spunti e idee, oppure per mandare in esecuzione alcuni take di registrazione durante una performance live. Non permette invece di indirizzare le 4 tracce su uscite differenti.
B. Sezione Moduli
In questa sezione, l’aggiornamento alla versione 2.0.0, non ha apportato alcuna modifica, se non quella indiretta di mappare via CC tutti i knob e gli interruttori dei moduli dei due slot. attraverso il tasto Map CCs della Tab Setup/Midi
C. Sezione Tastiera
In questa sezione, ai due lati dello Slider verde, rispettivamente alla sua sinistra e alla sua destra, sono stati aggiunti un Indicatore dello stato della batteria dell’iPad; e un tasto di Hold, che mantiene premuti i tasti della tastiera (nel caso in cui sia attiva l’impostazione Mono nel menù KB Scale, agisce su un solo tasto per volta), lasciando l’utente libero di utilizzare entrambe le mani per la configurazione della modulazione sonora all’interno dell’X/Y Pad.
![]()
Per avere un riscontro visivo di quanto descritto fino ad ora, e sopratutto per comprendere meglio le caratteristiche dell’ultimo aggiornamento (2.0.0), è altamente consigliata la visione del seguente video disponibile sul sito Moog.
Considerazioni finali
Risulta difficile non essere entusiasti di Animoog. Capirne il corretto funzionamento è sicuramente il primo e non semplicissimo passo, ma significa anche essere consapevoli e condividere in ogni singola parola, la definizione riportata sul sito Moog:
“Animoog è il primo sintetizzatore professionale progettato per l’iPad. Basato sul nuovo motore di sintesi anisotropa Moog, Animoog cattura il vasto vocabolario sonoro dei sintetizzatori Moog e lo applica al paradigma delle moderne superfici touch, consente ad ogni utente di scolpire rapidamente sonorità incredibilmente fluide e dinamiche che vivono, respirano, e si evolvono mentre vengono riprodotte.”
Probabilmente non sarà il primo sintetizzatore progettato per iPad, e non sarà nemmeno l’ultimo, ma per quanto riguarda la professionalità, mi sento di affermare che difficilmente se ne possano trovare di pari livello.
È giusto sottolineare anche la nota presente sul manuale d’istruzioni:
“Animoog è un sintetizzatore professionale polifonico che deriva dalle ricerche del Dr.Robert Moog sulle tecnologie di superfici-touch al fine di creare strumenti musicali nuovi ed espressivi.”
A tal proposito credo che se il Dr. Robert Moog avesse avuto la possibilità di vedere le sue ricerche in tale ambito prendere vita e materializzarsi su un iPad, avrebbe fatto i salti di gioia.
È evidente che questo tipo di tecnologia si presta in maniera eccelsa alla Anisotropic Synht Engine di casa Moog.
Il panorama timbrico ottenibile attraverso una modulazione sonora con la quale dialoghiamo mediante uno schermo touch screen, assume dimensioni non facilmente immaginabili.
Una scheda audio professionale, fornisce ad Animoog una qualità sonora di timbri, e relativi preset, assolutamente invidiabile. Il confronto del singolo timbro con i suoni di un Little Phatty o di un Voyager, lascia Animoog qualche gradino più in basso, mancando quella grana che contraddistingue il suono analogico. Se i termini di paragone diventano i suoi preset, e quindi sonorità polifoniche costituite da 8 timbri e svariate possibilità di evoluzioni, allora Animoog risulta essere un prodotto molto interessante e stimolante, anche più avvincente di un Little Phatty.
Delle novità introdotte nell’ultima versione, trovo di notevole rilevanza la possibilità di utilizzare l’accelerometro dell’iPad come controllo della modulazione.
La modulazione sonora di Animoog assume un sapore completamente differente grazie a questa funzione. Si tratta di un’implementazione che colloca la sintesi sonora anisotropa in un contesto tridimensionale, fornendo all’utente un controllo spaziale a 360° su timbri e forme d’onda.
La nuova funzione Map CCs, grazie alla quale è possibile mappare via midi tutti i parametri con un controller fisico, da l’impressione di suonare un vero synth hardware Moog, e migliora notevolmente la precisione e il dettaglio delle modulazioni sonore.
La nuova Tab 4 Track, trovo sia l’implementazione di minore rilevanza. Avendo più volte sottolineato i connotati di professionalità di questo strumento, ritengo che rimandare ad appositi sequencer multitraccia (software o hardware che siano), il compito di gestire la composizione di clip, tracce, e progetti musicali, possa portare a risultati analoghi, ma di qualità sicuramente superiore.
Unica critica che può essere mossa ad Animoog, riguarda la percezione che l’utente riesce ad avere delle forme d’onda. Trovo che sarebbe di grande supporto alla composizione del vettore polifonico, così come alla pianificazione della modulazione sonora tridimensionale, avere una più chiara conoscenza delle forme d’onda che costituiscono un timbro.
Si potrebbe ipotizzare un menù, da aggiungere alla tab Timbres, al cui interno siano visualizzate (sottoforma di elenco nominale, o attraverso rappresentazioni grafiche), la o le forme d’onda di ciascun timbro.
Infine va ricordato un aspetto non di minor importanza: attualmente il costo di Animoog è di 26,99 € per iPad, e di 8,99 € per iPhone. In diversi momenti Moog ha messo l’app in offerta a 0.70 € (o poco più). Non faccio parte degli utenti che hanno approfittato dell’offerta, ma posso garantire che pur essendo la più pagata del mio iPad, Animoog è un’app che vale fino all’ultimo centesimo speso. Va inoltre sottolineato che le versioni per iPad e iPhone non sono la medesima app: la prima si chiama appunto Animoog, la seconda si chiama invece Animoog per iPhone. La cronologia degli aggiornamenti indica che le due app seguono un percorso di sviluppo non perfettamente identico. La versione per iPad, come abbiamo avuto modo di osservare, è giunta alla release 2.0.0 (Animoog 2); Animoog per iPhone è invece giunta alla release 1.1.1. Anche le implementazioni seguono inevitabilmente un percorso differente. Maggiori informazioni al riguardo sono disponibili sul sito Moog, o sulla pagina dello store dell’apple.
Pro (andrebbero annoverati tutti gli aspetti descritti fino ad ora)
- ottima qualità audio;
- enormi possibilità di modulazione sonora;
- rapido accesso al manuale d’istruzioni;
- estremamente curata nell’aspetto grafico;
- stabilità (mai riscontrata una chiusura improvvisa).
Contro
- il primo approccio non è dei più semplici;
- una lettura del manuale d’istruzioni è estremamente consigliata (necessaria);
- costi elevati;
- non chiara composizione della componente x (forme d’onda) dei vettori polifonici;
- la qualità del connettore jack dell’iPad limita notevolmente l’elevatissima qualità sonora dei timbri.
INFORMAZIONI UTILI
Produttore: Moog Music Inc.
Modello: Animoog V. 2.0.0
Website: Animoog
costi:
- Animoog – 26,99 €;
- Animoog per iPhone – 8,99 €;
- Expansion Pack – da 1,79 € ad un massimo di 4,49€.
connettività Midi:
- wifi;
- iPad Camera Connection Kit (usb).
Animoog is a Moog Music Inc. app and to say something more on who created it out, would be superfluous. We will focus only and exclusively on one of the latest products by Moog. During our tests, we will try to figure out if Animoog is a niche software, dedicated to the synthesis most inquiring fans, or a sound creative product.
An innovative sound synthesis
Animoog is a synthesizer for Apple devices. It is not meant as an emulation of the existing hardware products. It is a software-only synth, developed by Moog, specially for iPad/iPhone.
The sound synthesis technique used by Animoog is based on the concept of Anisotropia. This kind of technique has been called ASE (Anisotropic Synth Engine).In a concise and effective way, Moog defines the anisotropic sound synthesis as a dynamic animation of waveforms that occurs along a path defined within a x/y grid.
Actually the Anisotropic Synth Engine introduced by Moog can be considered as the evolution of a previous sound synthesis technique trough vector, called Vector Synthesis, introduced towards the end of the 80s by Sequential Circuits.
The Animoog x/y grid: 16 waveforms and 8 timbres
To understand the basics of Anisotropic Synth Engine, let’s consider the space identified by a pair of Cartesian axes x/y, let’s suppose to draw a path inside it, and finally let’s imagine playing the synthesizer keyboard. The notes will follow the track designed and will withstand a sound modulation defined by the composition of the x/y grid. This is exactly what happens playing Animoog.
In Animoog the x/y space is a regular quadratic 16×8 grid composed of 8 timbres (y-axis), and 16 waveforms (x axis). Growing within this kind of x/y space, the sound generated by Animoog is a polyphonic vector.
The 8 timbres, so the y component of the polyphonic vector, are selected by the user from a list of 57 timbres derived from classic Moog synthesizers such as Voyager, Little Phatty, MF-103 12 Stage Phaser, MF-105 MURF, and others. Each of the 8 timbres can be static and so may contain a single waveform, or dynamic and contain up to a maximum of 16 waveforms. The evolution of the waveforms is the x component of the polyphonic vector.
The timbres audio quality is extremely high. Surely what has a negative effect on the Animoog audio, is the evident limitations of the iPad jack output. The use of Animoog alongside a good quality sound interface, makes the distinction between some tones of a Little Phatty and an iPad difficult in a mix.
The Animoog x/y grid: motion along the path
The polyphonic vector is represented on the grid x / y by the motion of a colored cursor along the traced path (every note generated is a cursor with different color). The sound produced by the synthesizer will be a combination of timbres and waveforms, which evolves along the traced path.
The sounds generated by this method are further enhanced by a traditional synthesis architecture in a Moog style consisting of ladder filter and overdrive. This architecture lets you calibrate both some more traditional synthesis parameters such as cutoff, resonance, delay, thick, and some of the parameters that influence more directly the motion along the path, such as orbit, path and rate.
Each path is anchored to a small green circle within the grid x/y. Through this anchor it’s possible to move the path within the grid thus obtaining, for the same path, new combinations of timbres and waveforms.
This is one of the most distinctive features of Animoog and allows to have very dynamic performances. The sounds can evolve in a very fluid way, simply by dragging the small green circle in the grid with one hand, and playing the keyboard with the other one.
The Animoog look
Avoiding any excessive detail about the Animoog menu, submenu, knobs and switch, as this short review has no intention to replace the excellent instruction manual (available on the Moog website and within the app) , we will provide here the guidelines to configure and modulate the anisotropic sound synthesis.
For a clearer description, let’s split the window Animoog into 3 sub sections:
A. Monitor section , consisting of a series of tabs, the content of which will be visible on the Animoog main screen. At the bottom of the screen there are menus for the presets and time (BPM) management.
B. Modules section, two sliding slots divided in modules with severals knobs and parameters in order to configure the sound modulation.
C. Keyboard section, containing the keyboard and some menus for its management.
A. Monitor Section
At each start up Animoog uploads the default preset and displays the contents of the first tab, located in the upper portion. By pressing on the name of each tab, it will show its contents.
X/Y Pad
Represents the main window of Animoog and is constituted by the grid of 8 timbres and 16 waveforms. The notes generated by the keyboard are represented by colored cursors that follow the path traced inside. The type of cursor movement along the path can be defined by the Path and Orbit modules located in two knob’s slots in section B (modules).
Further characteristic of the X/Y Pad, is the presence of an oscilloscope over of the grid that shows the waveform evolution depending on modulations and traced path.
Timbres
This is the menu where you can select, from among a list of 57 timbres (56 + 1 mute timbre defined Silence), the 8 that make up the y component of the polyphonic vector and that represent the Moog anisotropic sound synthesis oscillators. To the list of 8 timbres correspond, from top to bottom, the 8 vertical cells of the X/Y Pad. On this menu you can listen to a preview of each timbre.
To change the y component of the vector polyphonic just drag one of the 8 timbres in to a different position, or replace it by selecting a different list.
What I think is missing on this menu, it is an immediate feedback of the waveforms of each timbre. In the configuration of the anisotropic sound synthesis, you can only interact with the y component of the vector polyphonic. It is possible to choose the timbre, but you can not know if it contains one waveform or more. The only chance to have this type of information is: either hope that the name of the timbre could give you some indication or hear the timbre preview; navigate to the tab X/Y Pad and observe the oscilloscope.
Env/Mod
On this menu it’s possible to define the envelopes curves for AMP (amplitude), FILTER (filter), MOD (modulation). Clicking on each individual curve you can zoomin for a more accurate drawing of the attack, decay, sustain and release phases. To the right of the envelopes there are the parameters for the LFO (Rate, Sync, Shape, KB Trig) management, which constitutes one of the possible modulation sources. In the lower portion of LFO, there are 4 modulation slots, each of which consists of three sections:
- Source – (OFF, LFO, MOD, Psition X-, Y-Position) it is the modulation source. When the Source is set on OFF, the control section becomes the modulation source. It has a bipolar konbb of Amount (-100, 0, +100).
- Control – can be the modulation source if the Source slot is set on OFF, or be a control instrument of the selected source through the selected Control parameter (OFF, Poly Pressure, Chan Pressure, Velocity, Key Pitch, Mod Wheel, Pitch Bend ). As for the Source, it’s equipped with a bipolar konbb of Amount (-100, 0, +100).
- Destination – it’s the object of the modulation (OFF, Filter Freq., Res Filter, Filter WTSA, Filter Drive, Rate Orbit, Orbit WTSA X, Y WTSA Orbit, Path Rate, Path Origin, LFO Rate, LFO Shape, Thick Detune , Pithc 1 Semitone, Pitch 5 Semitone).
KB-Scale
This menu allows you to select the Root Note and keyboard Scale. The latter can be selected from a list (chromatic, ionian, dorian etc.), or customized at the user’s will checking/unchecking the buttons to make them active/inactive . The menu also contains the controls for the voices management (1 or 4): Mono, Legato, Phase Reset. The key Legato takes effect only if the Mono button is active.
With both keys Mono and Legato in the active position, the voice is reactivated when detached notes are played; the voice is not reactivated when overlapped notes are played. The Glide is activated with the overlapping of adjacent notes and not.
With the Mono active and Legato off, each new note played generates new phases. The Glide function is active only for adjacent notes.
With Phase Reset active, ASE oscillators generate identical phases when new note are played.
Setup
In this tab there are some general settings:
-
- Midi – settings for MIDI connections (Wi-Fi or usb.) It should be noted that by default only messages midi-in can be used, the midi-out function is instead activated exclusively through the purchase of special expansion pack There is also a Refresh button to update the list of available MIDI connections, a Panic button, to send messages All Note Off (in the case of “enchanted” notes).
- Presets – Allows the Import/Export presets via iTunes, it also offers the possibility to create New Preset, or Random Preset (completely random in the composition of all parameters), and delete existing presets with the function Delete Preset.
- Configuration – contains settings for the displays managing such as turn on/off the Pithc Bend, the Modulation Wheel, and the oscilloscope overlapped on the grid, but also the settings of the audio in background (very useful if you work with more music apps ).
- Manual – allows to browse the manual Animoog.
Store
By clicking on this tab you can access a sub-menu that allows to download additional content. The expansion pack can include both sets of additional timbres, and midi implementations. To purchase any of the expansion packs, a version of Animoog updated to the latest release is requite.
Preset, Bpm, Tap
In the lower portion of the monitor section, we can find a menu to select the Presets (combinations of sounds and waveforms) created by Moog, and sorted in groups: Bass, Efx, Hits, Keys, Leads, Pads, Plucked, User.
The presets can be modified and saved with a new name in the User group. On the side of the preset menu, we find the Bpm monitor and its TAP button that allow you to determine the execution time, which you can synchronize the parameters of the sound modulation to.
B. Modules section
To the right of the Monitor section there are two sliding slots containing 3 modules each, which manage various synthesis parameters.
Only two modules are visible at the same time, one for each slot. By pressing the arrow on top and at the bottom of the modules displayed, you can scroll through the slot to display the following modules.
In the left slot modules there are Filter, Path, Orbit, into the right there are Delay, Thick, Recorder.
Filter (left slot)
It is a resonant filter that can be set as the LP (low pass), BP (band pass), HP (high pass). It Influence the Anisotropic Synth Engine amplifying, attenuating, or throughs letting the frequencies established. It allows to Adjust: Drive (frequency level pre-filtered), Env (bipolar modulation control of the filter), Frequency (cutting frequency), Res (resonance around the value of the cutoff frequency).
Orbit (left slot)
It is a low frequency oscillator which affects the nature of the polyphonic vector, and so the Animoog’s voices, modulating the position of the colored cursors during their motion. Increasing values of the X and Y Amount create orbit movements of the cursor along the traced path. The value of Rate determines the speed with which the cursors performs the orbits. The Sync function synchronizes the time rate to the time indicated on the BPM monitor in as its divisors or multiples.
Path (right slot)
This module lets you to trace the path that the colored cursors will follow within the grid x / y. The Edit switch enables/disables the editing the path (from 1 to a maximum of 14 lines connected by a maximum of 15 points). The Clear switch clears the paths. The Mode selector lets you to choose the behavior of the cursor along the path (Loop, Back / Forth, Once). The Rate switch sets how fast the cursor will walk the path. The Sync switch lets you to synchronize the time rate with time indicated in the BPM monitor in terms of its divisors or multiples.
Thick (right slot)
This module controls and allows the determination of the following parameters:
- Crush – adds distortion effects.
- Drive – adds saturation effects.
- Detune – manages the offset and the pan of 2 or 4 selected voices through the switch Unison.
Delay (right slot)
Delay management module that allows you to adjust the Mix, so the balance between the original signal and the delayed one; the Feedback, so the amount of mixed signal that comes back as delay input; the Time, so the delay time; the Sync, so the synchronizing value of time to the specified value in the BPM monitor as its divisors or multiples.
Record (right slot)
It is a virtual recording module. It allows the performance recording, even on multiple levels. It’s equipped with a Play/Stop switch, which allows you to listen and stop the registration; a Record switch, which starts new recordings; an Overdub switch, which when activated, allows to record new audio levels on the same performance; two Buffer switches (copy and paste) to save the performance as a .wav file and their management; a Clear switch, which removes the last entry in the buffer.
Despite what one might think, controlling precision’s level of the various modules knobs, it is not to be underestimated. Touching a knob, you can move your finger up and down along the iPad’s height to rotate it. Is not necessary to make a circular motion with your finger then. The same situation occurs when you use more fingers on different knob.
One finger will always control the same knobs until it loses contact with the screen of the iPad.
C. Keyboard section
In the upper portion of the section we can find a green Slider witch allows to interact with the keyboard’s size and range
Moving to the right or to the left position of the slider, changes the position of the keyboard through the octaves. Stretch or shrink the slider to resize the keyboard leads to increasing or decreasing the number of visible buttons.
The surface of each button is a vertical controller, equipped with a bright indicator, wich can be used as a Control in the 4 slot modulation tab Env / Mod.
On the left portion of the keyboard there are the controls for the Pitch Bend and Modulation Wheel, which are also equipped with a light proportional to the control value. The two controls can be enabled or disabled through the Setup tab.
On the right side of the keyboard are the knobs that regulate:
- Volume master;
- Cor, the pitch-correction;
- Glide, the portamento control.
Animoog V2 – update to the latest version (2.0.0)
With the latest update, issued on 20/12/12, Moog further enhanced Animoog, making it an even more efficient instrument. The news on last update will be illustrated below, consideranding the 3 sections A, B, C.
A. Monitor Section
In this section some functions has been implemented in the tab Env/Mod, KB Scale, and Setup. It was also introduced, a new tab: 4 Track.
Env/Mod
In this tab some interesting features to the 4-slot modulation has been introduced. In the Control parameter we can find the following new items: accel-x, accel-y, accel-z. It’s therefore possible to use the iPad’s accelerometer as a modulation’s control.
The controlling of the Y-X Amount parameters of the Orbit module respectively with Accel-x and Accel-y, was the most exciting among the tests carried out. Moving and orienting the iPad in space to control the orbit of the sliders along the way, gives the impression of having the Animoog’s notes in your hands, and being able to move them.
To emprove this configuration, I suggest to add the control of Thick Detune parameter through the accel-z, and then moving the iPad up and down.
KB Scale
In this tab a keyboard Lock function has been added, to preserve the scale settings of the saved presets, and preventing accidental changes.
Setup
In the Midi section of this tab a button to define the Range of the Pitch Bend has been added, and a Map CCs button that allows to map (with CC messages) all Animoog’s knobs and controls. It’s also possible to save/load existing mappings using the button Save/Load CC Map.
This implementation could be extremely useful. It allows you to map Animoog with a midi controller, and so use real knobs. You can get a parameter management, in the two sliding slots, more accurate than you could get with the iPad’s surface.
In addition to this, by mapping all Animoog knobs, you can simultaneously control parameters that belong to the same slot, therefore it should be managed independently. For example, without a properly mapped controller, it would not be possible to simultaneously manage Frequency and Orbit-Rate cause both of them belong to the left slot.
Controlling the filter and the orbits of Animoog with real Moog knobs (such as those of a Little Phatty) was a fantastic experience that it recommend to try.
4 Track
This tab opens a multitrack sequencer (up to 4 tracks). It allows the creation of musical projects in which to record the result of playing and modulation. After starting a recording, it is therfore possible to return to the X/Y Pad window.The 4 Track tab offers:
- transpose controls such as Play, Pause, Stop, Rec, Back;
- commands of Loopl, Mute, Solo, Arm, Volume for each track;
- master Volume management;
- Metronome management;
- Cut, Copy, Split, Loop, Color for each recorded clip;
- Load Clip (from the iPad library), Paste Clip (from other tracks), Clear Track;
- Project registration management;
- compatibility with the AudioCopy/Paste protocol.
At the moment the 4Track tab is only a tool to record ideas and suggestions, or to send some recording taken during a live performance. It does not allow to redirect the 4 tracks on different outputs instead.
B. Modules section
The upgrade to version 2.0.0 has not made any changes in this section, except for the mapping via CC of all knobs and switches of the two slot modules through the Map CCs button (Setup/Midi tab)
C. Keyboard section
On the two sides of the green Slider, respectively to the left and to the right, the update added an iPad battery status Indicator and a Hold button for the keyboard (if the Mono setting in the KB Scale menu is activated, the hold button affects only one key at the time). The Hold button allows to use both hands to set up the sound modulation on the X/Y Pad.
![]()
To get an idea of what has been described, and especially to better understand the features of the latest update (2.0.0), it is highly recommended to have a look at the following video available on the Moog web-site.
Final consideration
It’s hard not to be excited about Animoog. Understanding the exact functioning is definitely the first and uneasy stepto take, but it also means sharing and being aware of every single word of the Animoog definition given on the Moog web site:
“Animoog is the first professional synthesizer designed for the iPad. Powered by Moog’s new Anisotropic Synthesis Engine, Animoog captures the vast sonic vocabulary of Moog synthesizers and applies it to the moderntouch surface paradigm,
enabling any user to quickly sculpt incredibly fluid and dynamic sounds that live, breathe, and evolve as you play them.”
Probably Animoog is not the first synthesizer designed for the iPad, and will not be the last one, but, what about the professionalism, it will be very hard to find an other at the same level.
It is worth emphasizing also the note on the user’s manual:
“Animoog is a professional polyphonic synthesizer that carries on Dr. Robert Moog’s exploration of touch-surface technologies to create new and expressive musical instruments.”
I believe that if Dr. Robert Moog had a chance to see his research in this area come to life and materialize on the iPad, he would be very proud.
This kind of technology is perfect for the Moog Anisotropic Synht Engine.
The timbre assortment achieved through a touch screen sound modulation, is enormous.
A professional sound interface provides the Animoog timbres and presets a very impressively sound quality. The comparison of single timbre with the Little Phatty or Voyager sounds, lets Animoog down a bit. In this comparison, the Animoog sounds doesn’t have the same features of the analog sound. If the terms of comparison become its preset and polyphonic sounds (consisting of 8 timbres and many evolutions), then Animoog becomes a very interesting and challenging product, even more compelling than a Little Phatty.
Regarding the changes introduced in the latest Animoog version, the possibility of using the iPad’s accelerometer as a control of the modulation is very important.
The Animoog sound modulation has a completely different aspect thanks to this feature. It is an implementation that places the anisotropic sound synthesis in a three-dimensional context, allowing a 360° spatial control of timbres and waveforms.
The new Map CCs function, thanks to which you can map all parameters via midi with a physical controller, gives the impression of playing a real hardware Moog synth, and improves the accuracy and detail of sound shaping.
In my opinion the new Tab 4 Track is the least important implementation. Having repeatedly remarked the Animoog characteristics of professionalism, I think that using a multitrack sequencer (software or hardware), in order to manage the composition of clips, tracks, and musical projects, can lead to similar results, with a superior quality.
A criticism that can be done to Animoog, is about the user’s perception of the waveforms. I think that obtaing a clearer understanding of the timbre’s waveforms, it would be a great support to the polyphonic vector composition, as well as to the three-dimensional sound modulation planning.
It would be very useful to add a menu to the tab timbres, which show (as well as a names list, or as a graphical representation), the waveforms of each individual timbre.
Last but not least: currently the cost of Animoog is 26.99 € for iPad, and 8.99 € for iPhone. Occasionaly Moog has put the app on sale for € 0.70 (or slightly more). I’m not part of the users that have taken advantage of the offers, but I can guarantee that despite being my highest paid iPad’s app, Animoog is worth every cent. It should also be remarked that the versions for the iPad and iPhone are not the same app: the first is called just Animoog, the second is called Animoog for iPhone instead. The update history indicates that the two apps follow a development path that is not perfectly identical. The iPad version, as we have observed, has come to the 2.0.0 (Animoog 2) release. Animoog for iPhone is instead now in the 1.1.1 release. Even implementations inevitably follow a different path. More information on this is available on the Moog website, or on the page of the Apple store.
Pro (all the feature described should be enumerate)
- high audio quality;
- big opportunity to modulate the sound;
- easy access to the user’s manual;
- look extremely detailed;
- stability (the app has never crasched during the tests)
Contro
- uneasy first approach
- reading the user’s manual is realy recommended;
- high price;
- not clear x component composition (wavefor) of the polifonic vector;
- the qualty of the iPad’s jack restrict the high level quality timbres.
USEFUL INFORMATION
Constructor: Moog Music Inc.
Model: Animoog V. 2.0.0
Website: Animoog
price:
- Animoog – 26,99 €;
- Animoog for iPhone – 8,99 €;
- Expansion Pack – from 1,79 € to 4,49€.
Midi connectivity:
- wifi;
- iPad Camera Connection Kit (usb).