

After having devoted ample space to the "performative" aspects of the new LPX in the first article (link), in this second part we deal with the new virtual instruments, in particular the new Sampler sampler and the related new ways of managing both audio and MIDI files.
It was 2001/2002 when I bought the Emagic EXS24 for the modest sum of around € 500 (Apple will acquire the entire Emagic only a few years later, "liberalizing" the entire range of effects and virtual instruments that already accompanied Logic Platinum. ed).
Then, in 2012, Apple itself will acquire Andrea Gozzi's Redmatica, leaving us amazed and without more support how many, like me, had also invested in Keymaps, AutoSampler, Pro Managers (Fig.1).

Since that moment, I have been waiting impatiently for the return of certain features that were missing from the EXS24 and that Andrea Gozzi had developed in a far-sighted way, and also with a certain genius, often noting in the forums how necessary it was to have those characteristics within the sampler by Logic. Well, apparently the wait is over… maybe!
The philosophy of the new samplers
The introduction of Sampler definitely retires the EXS24, of which the veterans will surely also remember a VST version called simply EXSP24 present in the Emagic catalog and no longer developed by Apple, for obvious marketing reasons.
samplers, and the “simpler” version Quick Sampler (from now on QS), keep the extension .exs also to ensure backward compatibility with all libraries developed to date: this goes a little against the trend with respect to the usual Apple policies always aimed at innovating, but whatever the purpose of this choice is, we users are fine for the moment!
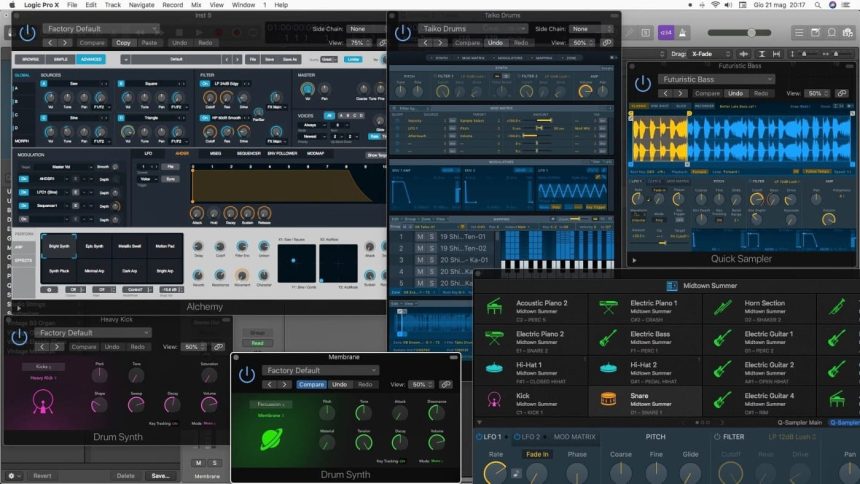
Both share the synthesis parameters, obviously to the advantage of Sampler, which include (Fig.2)

- A general intonation module of the instrument in which, in addition to the more usual controls, also the Glide, different randomization parameters and Unison up to 8 items (the latter are missing on QS);
- 2 multifido filters (1 on QS): usable both in serial and parallel, with slopes that reach 24 dB / octave (LPF and HPF), 12 dB / octave (BPF), 6 dB / octave (Notch);
- 5 Envelopes of type AD, AR, ADSR, AHDSR, DADSR, DAHDSR (A = Attack, D = Decay, H = Hold, S = Sustain, R = Release) In QS there are only 3 envelopes and basic types;
- 4 LFOs (2 in QS): with the classic Sinusoidal, Triangular, Sawtooth, Square and double Random waveforms. There are, among other things, the Sync at the time of LPX, the KeyTrigger in Mono / Poly mode and the uni / bipolar reading of the waveform;
- 20 Modulation Matrixes programmable (4 in QS, plus two fixed dedicated to the 2 LFOs): in addition to the Source, Destination (here called Target) and atAmount, both positive and negative, as for the old EXS24 there is the presence of the "VIA" column with which you can influence the action of the entire matrix through an external controller (the classic Modulation Wheel, for example) or even a second Modulators (this is how Envelopes and LFOs are cataloged);
- At the bottom of the screen, hidden in the pop-up menu, the MIDI Mono Mode and the related Pitch Range for managing mono Channel Voice performances.
For the differences, read further ...
Quick Sampler
The "entry level" Quick Sampler model (QS) is the simplest an inexperienced user could want to create their own sample libraries (Fig.3). Just drag an audio file into the plug.in with a simple Drag'n Drop, either from the LPX itself or from any directory on the Mac, to find it available on the entire keyboard without banging your head in long mapping times. It should be noted that if you choose one of the thousands of Apple Loops, QS recognizes, by converting them, even those of a MIDI nature.
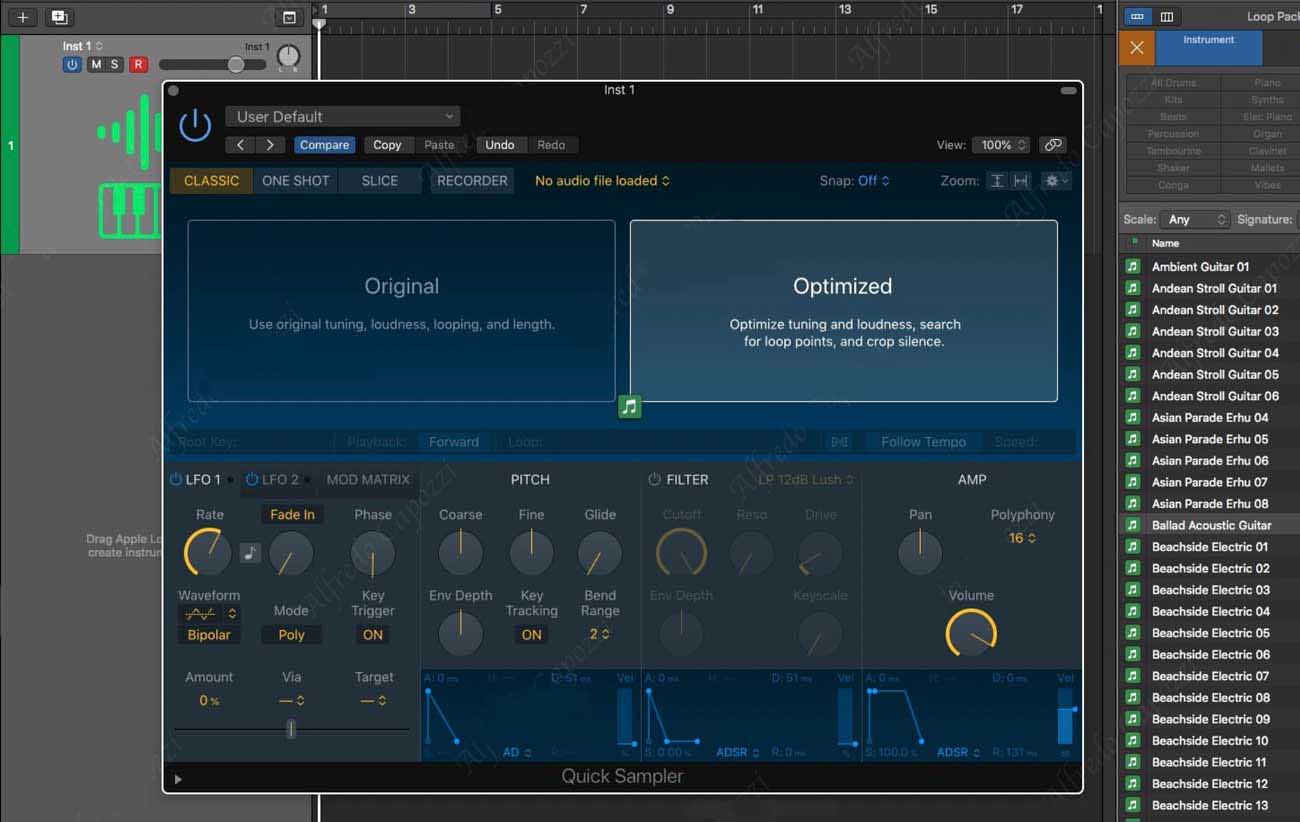
The algorithms that "decide" how to use the audio file, after an almost instantaneous analysis, are basically two: Original e Optimized. In the first case, QS keeps intact the characteristics of the audio file in terms of pitch, amplitude / loudness, duration and loop, if any; in the second case, the parameters just mentioned are rewritten and optimized by adding a cropping automatic, in case the audio file has silences / gaps at the beginning and at the end of the actual audio signal.
When analyzed, the audio file is displayed with its own waveform in the center of the window QS and can be played in three ways:
- Classic: The file is played as long as any MIDI note is pressed. The audio file can also be read in Reverse e alternate, beyond linear (Forward);
- One Shot: just give a Note On pulse for the audio file to start playing from beginning to end without any interruption. If you press other notes, subsequent playbacks will add to the current one. The sample can be played linearly or in Reverse. Sensible for percussive sounds, much less so for prolonged and melodic ones;
- Slice: the audio file is “broken up” and arranged chromatically on the keyboard starting from note C1 (C1, MIDI note 36). This is a default condition that can be changed by the user afterwards. The slicing occurs according to three options that are placed on the first drop-down menu on the left under the waveform: Transient + Notes (is QS which analyzes and splits the file following the next parameter Sensitivity), Beat divisions (QS follows both a criterion for analyzing transients and their position on a variable rhythmic grid based on the value of the next parameter Division), Equal divisions (QS instead follows a criterion of equal subdivision of the waveform calculated on its total length: obviously it is the least precise if rhythmic files are used. The next parameter Slice establishes the number of divisions). With Manual it is the user who decides how to split the waveform in a completely free way. There is the possibility of following an interrupted playback logic if you leave the keyboard (parameter Gate), or to make sure that whatever note is pressed, the reading of the sample continues on the other steps until the end (parameter Play to End).
For all three modes, there are then the common parameters of Flextime and related Follow Time e Speed. With Flextime in practice it is established whether the reading of the sample must take place in the traditional way, i.e. with an acceleration of the reproduction for the notes above the RootKey and a slowdown for the lower ones, or with a synchronized reproduction whatever the note played, such as to also allow a correct polyphonic use whatever the content of the audio file. With Follow Time, which can only be activated if FlexTime is already active, QS adapts the sample reading to the LPX speed on the basis of the grid of values in the next drop-down menu Speed (from ⅛ to 8, following a logic of multiples of 2, with the value 1 corresponding to the real speed of the sample).
Nota:
Even if Apple does not declare it openly, I believe that at the base of these features there is the enhanced algorithm of the "Polyphonate", already present at the time in Keymap (Fig. 4) which made it possible to extend the entire audio file over an octave more and less without suffering from the classic problem of reading the sample according to the note played. This algorithm has already been used in Alchemy for some releases now.

Beyond the hypotheses, the fact is that QS represents the Swiss army knife with which any user, even the less experienced, can have fun creating new sounds to be included in their productions: the only limit ... the imagination!
Ah ... to conclude, QS it also offers the opportunity to record directly from the sound card configured in the Preferences.
Sampler
Structured on 5 operating areas with vertical scrolling and activated individually, Sampler acquires the operational logic of EXS24 enhancing it with various features present years ago in Redmatica Keymap (some functions even bear the same name. ed). Full compatibility with all the old library both by default and personal in case you have developed your own.
From an editing point of view, flying over areas Synth, Matrix Mod e Modulators already described above, the other two, Mapping e Areas concern the management of the samples: double click on each name and the specified area will occupy all the available space provided by the window (Fig.5).

The very simple structure makes an audio file occupy one Areas and different Areas can be part of a Group: end. It should be noted that the audio file can be edited in the content through the LPX audio editor (the user, however, can decide to use a different one) and that the apex of the structure is represented by the Preset/Instrument.
Reserved Areas
Starting from the bottom, the area Areas shows the waveform, which can also be zoomed with mouse scrolling, including handles for the Start / End and Fade In / Out of the sample, and of loop with lots of crossfade (XFade) dedicated. The same functions as for One Shot, Reverse, Flextime e Follow Time already described in Quick Sampler.
With the parameter Snap, Sampler helps with 3 algorithms (Zero Crossing, Transient e Beat) to recognize the best selection point for all the handles provided in the screen. Since the manual about it is rather laconic, from direct evidence I can note that: Zero Crossing, it is easy to imagine, it magnetizes the cursor to each point where the waveform reaches the “0” point of the Y axis; Transient operates in particular at the beginning, on the first Transient of a continuous audio content, while Beat prefers the rhythmic steps to be displayed in the "Display Beats Unit" mode (context menu "View"): Transient e Beat they are particularly useful for Rhythmic Grooves first of all, but also for all those musical phrasing where there are silences or "breaths" (I am referring to Voices, rather than Brass). All is three algorithms they are Zoom adaptive waveform. A small mention of the Vertical Zoom: if activated, it adapts the graphic width of the waveform constantly and automatically according to the portion displayed. Initially it can be confusing since the user always sees a waveform at maximum power even when this, in reality, has minimum values: an adaptive value scale, perhaps in dB, would have been welcome in this regard.
On the graphic front, in the contextual menu View, the possibility of viewing the stereo audio file either on both channels or as a mono sum of the two should be noted.
For the area Areas it should also be noted that in the contextual Edit menu there are some operating logics regarding the AutoLoop and, a little hidden among the items, two "cropping”Which allow you to cut the parts outside the Start / End points, rather than the Loop area. Attention, however, to a possible graphic Bug that does not restore the correct display of the waveform in case the Undo / Cancel of the Crop is activated (in this regard I have already sent a Bug Report to Apple, but a feedback from the readers). Also in this menu, the “Derive Tempo from Loop length” function should also be noted, which adapts the LPX performance to the length of the Loop: a sort of “branch” of the Adapt Tempo of the Transport Bar.
Reserved Mapping
Let's move on to the area Mapping Here all the part related to the Group and a Group, in fact, it is the set of one or more Areas “Homogeneous” both for audio content and for instrumental typology. Let me explain better with an example: if I sample a piano sound, I can assign it to a single Group as much a certain series of Areas united by the keyboard dynamics, as well as those in which there is the resonance of the strings to be activated with the Sustain pedal. The same can be done when dealing with grooves structured in parts of a song.
Therefore defined the Group, whose traditional modification parameters include Note and Velocity Range, Volume, Pan and Audio Out, Offset of Envelopes and Polyphony, it can be recalled according to different logics: Articulation ID, Pitch Bend, Control Change, MIDI Channel, Tempo Range and finally, Notes Number, in other words i KeySwitch. For each of these options, which can also be activated simultaneously, there are parameters and relative values to optimize their use as needed.
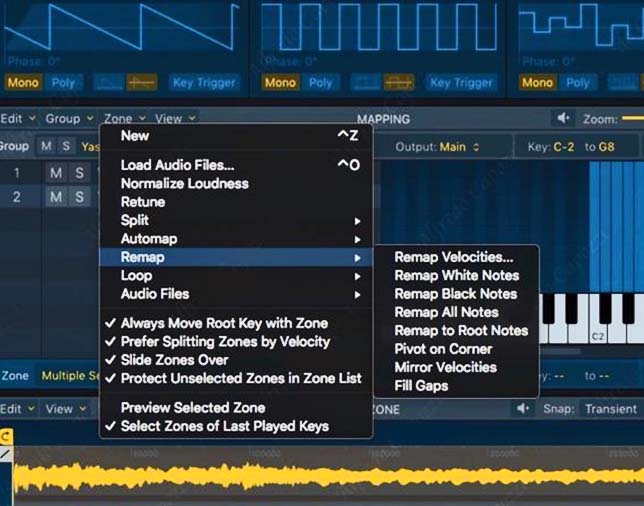
In Mapping we also find extended parameters for Zones, not present in the specific area, such as the section Audio File Tail which allows you to attach a second audio file at the end of the first, or the parameter Stairs in the section Mixer which, with the same MIDI Velocity, creates a linear power boost in the low / high note ratio, and vice versa, according to the positive / negative value, over the entire programmed Key Range: the curve adapts according to the number of occupying notes the Key Range; if the Key Range includes a single note, obviously the parameter does not affect anything. Always in Mapping we also find a contextual menu dedicated to Areas which includes, among other things, functions aimed at Normalization, Split, Automap, Remap and Loop samples (Fig.6).
Importing audio files is quite simple and offers several alternatives to those seen above for QS, all based on Drag'n Drop of one or more files. One of these involves dragging into the area Areas to see a Group dedicated with the same name as the audio file; again, opting for a Group empty, we can drag multiple files and with a vertical movement before releasing decide the desired Range, from a note to an octave, including the possibility of obtaining a dynamic multi-layer (all samples arranged on a note) rather than the arrangement of each single sample on Group separated. Once a first import of the files has been defined, they can be moved to any other position on the keyboard: the Root Key adapts to the movement made.
All this is to be considered as a function of interactive operation with all the other new features of LPX, for which the user avoids looking further, if not for the sound paste obtainable from the use of third-party plug.ins.
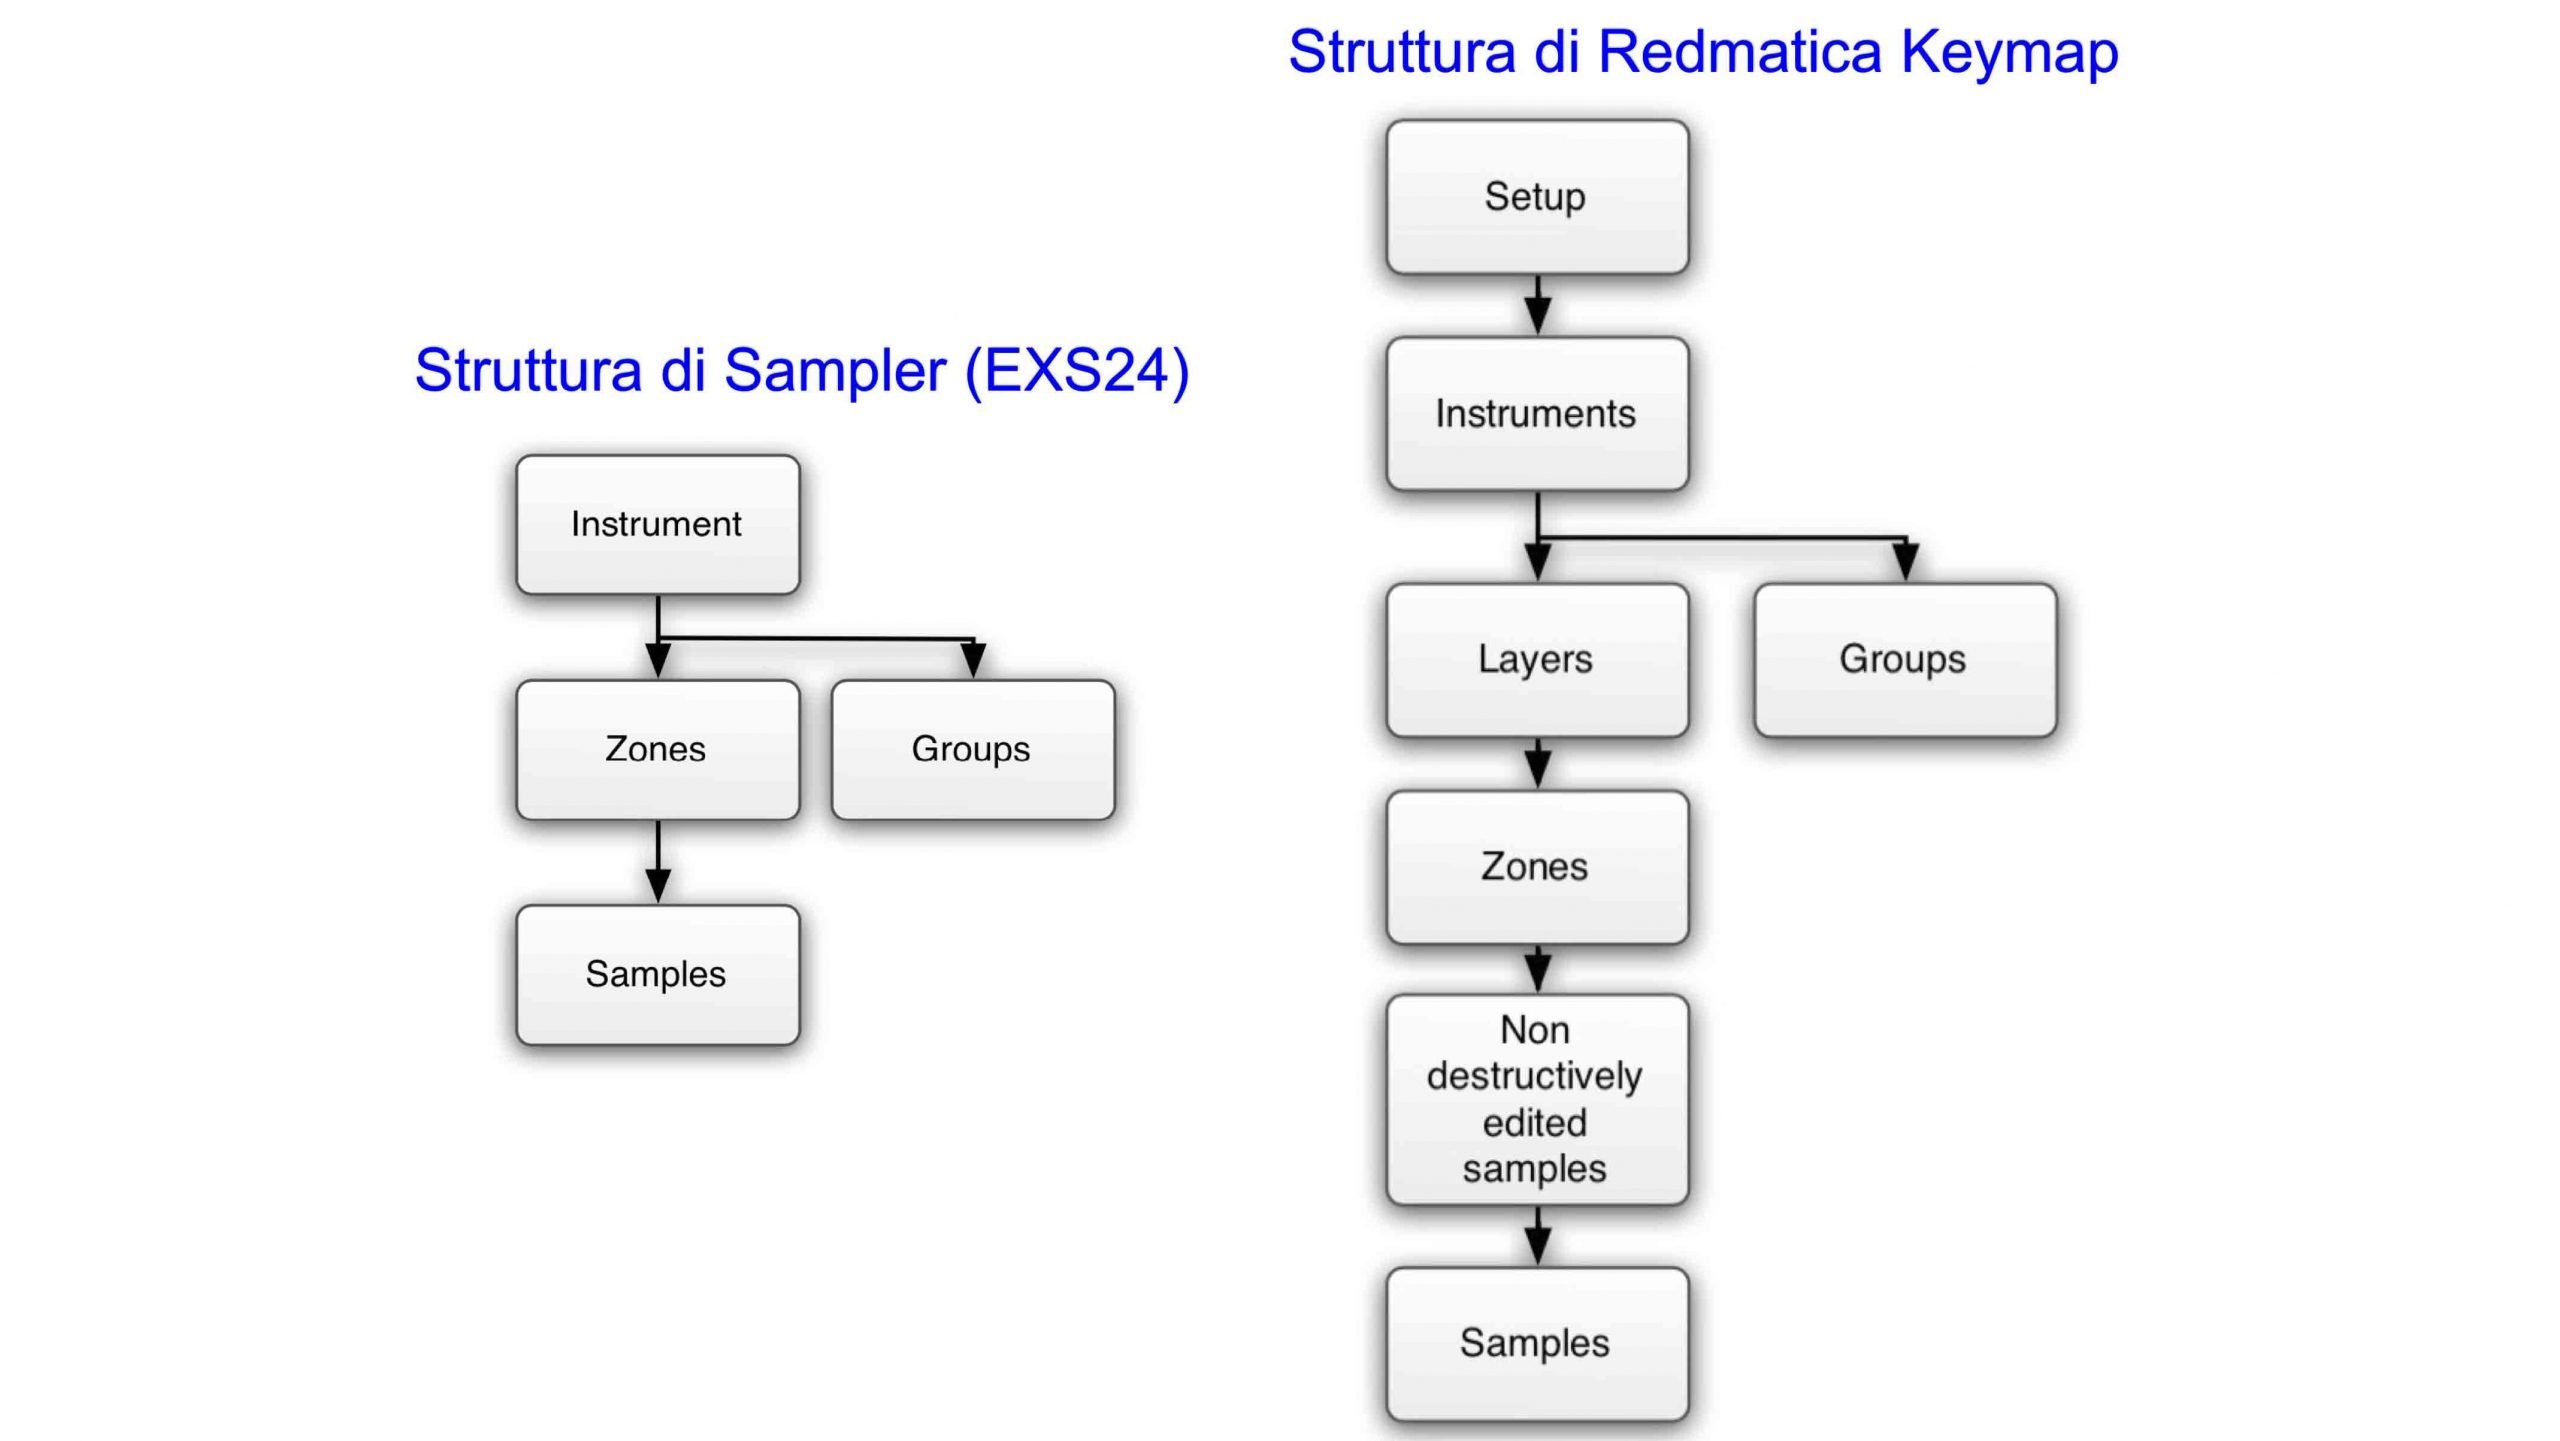
I conclude the analysis of Sampler with a personal consideration: even appreciating the effort made to innovate the EXS24, rather old to compete with the current Kontakt, Halion, Falcon and others similar, and it being understood that the new possibilities greatly simplify the creation of personal libraries, I believe that the new Apple-branded sampler is still at the beginning of a programming processing that has not yet expressed the maximum in terms of options and power; yet, Redmatica's technology, already quite innovative for the time, has been in Apple's possession for 8 years now. A time this long enough that the engineers of Cupertino, I think, could have taken better to offer already in this first release of Sampler a whole series of features to better compete with what is already on the market: in the meantime, I am referring to the more complex, but also more flexible, branching of the Keymap structure which included Areas e Group, even gods Layer that could be part of a Instrument (practically the current Preset di Sampler) which, in turn, could be grouped with other Instruments to form a -Setup (Fig.7): the latter, comparing it with the competition, is the highest level with which the libraries of the other Sample Players are now provided which, however, also benefit from a dedicated GUI that does not hurt: from the series ... even the eye wants his part.
AutoSampler
The AutoSampler (AS) should be considered an evolution (or almost !!!) of the App of the same name in the Redmatica catalog. Also keep in mind that Apple has made available AS already in MainStage 3 starting from 2015.
From the original, which allowed exporting to different formats including Kontakt, Structure and Reason, the new plug.in has retained the essential functions to create exclusive libraries for Sampler. AS, in practice, it is an automatic sampler (after all the name itself says it!) whose MIDI note signals can be sent both to external hardware instruments and to Virtual Instruments internal or external to LPX; can be called up on any track Audio / MIDI / Drummer / Pattern since it has been placed in the effect plug-ins in the category Utility. The fact is, however, that it must be configured with at least one audio track whose input must correspond to the physical connection of the sound card on which the external instrument has been connected, or provide for the input of a virtual audio connection in case it concerns software residing in macOS (Fig.8).

The very simple and intuitive parameters that can be changed concern:
- Start / End range: to define the limits of MIDI notes on which to place the samples;
- Sample Every: to establish how many semitones, place the Root Key of the samples. The programming of these first two parameters is displayed extemporaneously on the virtual keyboard above which also allows you to set the Start / End range with the two side handles.
- Round Robin: as most experts know, it establishes the number of samples to be reproduced in a +/- random way with the same MIDI Velocity;
- sustain: ie the duration, in tenths of a second, of each Note On sent to the instrument to be sampled;
- Velocity Layers: the number of dynamic levels for each single Root Key, maximum 16, in which to place the samples;
- Velocity Response: 7 Preset presets to define the Linear, Exponential or Logarithmic management to manage the Velocity Layers provided that the value 1 has not been chosen for the latter. It is possible to establish a personal criterion by calling the Custom setting;
- AutoLoop: 5 algorithms (Search, Search with XFade, Search with Rev XFade, Penrose Machine and Bidirectional) with which the Loops of each sample are determined, in compliance with the AutoLoop Start / End values. The value None disable AutoLoop.
- AutoLoop Start / End: two values, in percentage, which facilitate the search of the area for the starting and ending points of the AutoLoop, if activated;
- One Shot: forces the complete reading of the samples, without AutoLoop, whatever the duration of the note activated for the reproduction of the same. Obviously, this possibility can only be verified when the final Preset is loaded on Sampler.
- Input Gain: allows adjustment, in dB, of the input signal.
Once the parameters have been set, all you have to do is start the process with the "sample"And wait for it to finish: the duration of the process will obviously depend on the quantity of samples established and the duration (sustain) of each of them.
It should be noted that each sample will be nominated in a standard way, following the following scheme: Sampler instrument name - MIDI note - MIDI velocity - 4-character random suffix.
What is missing?
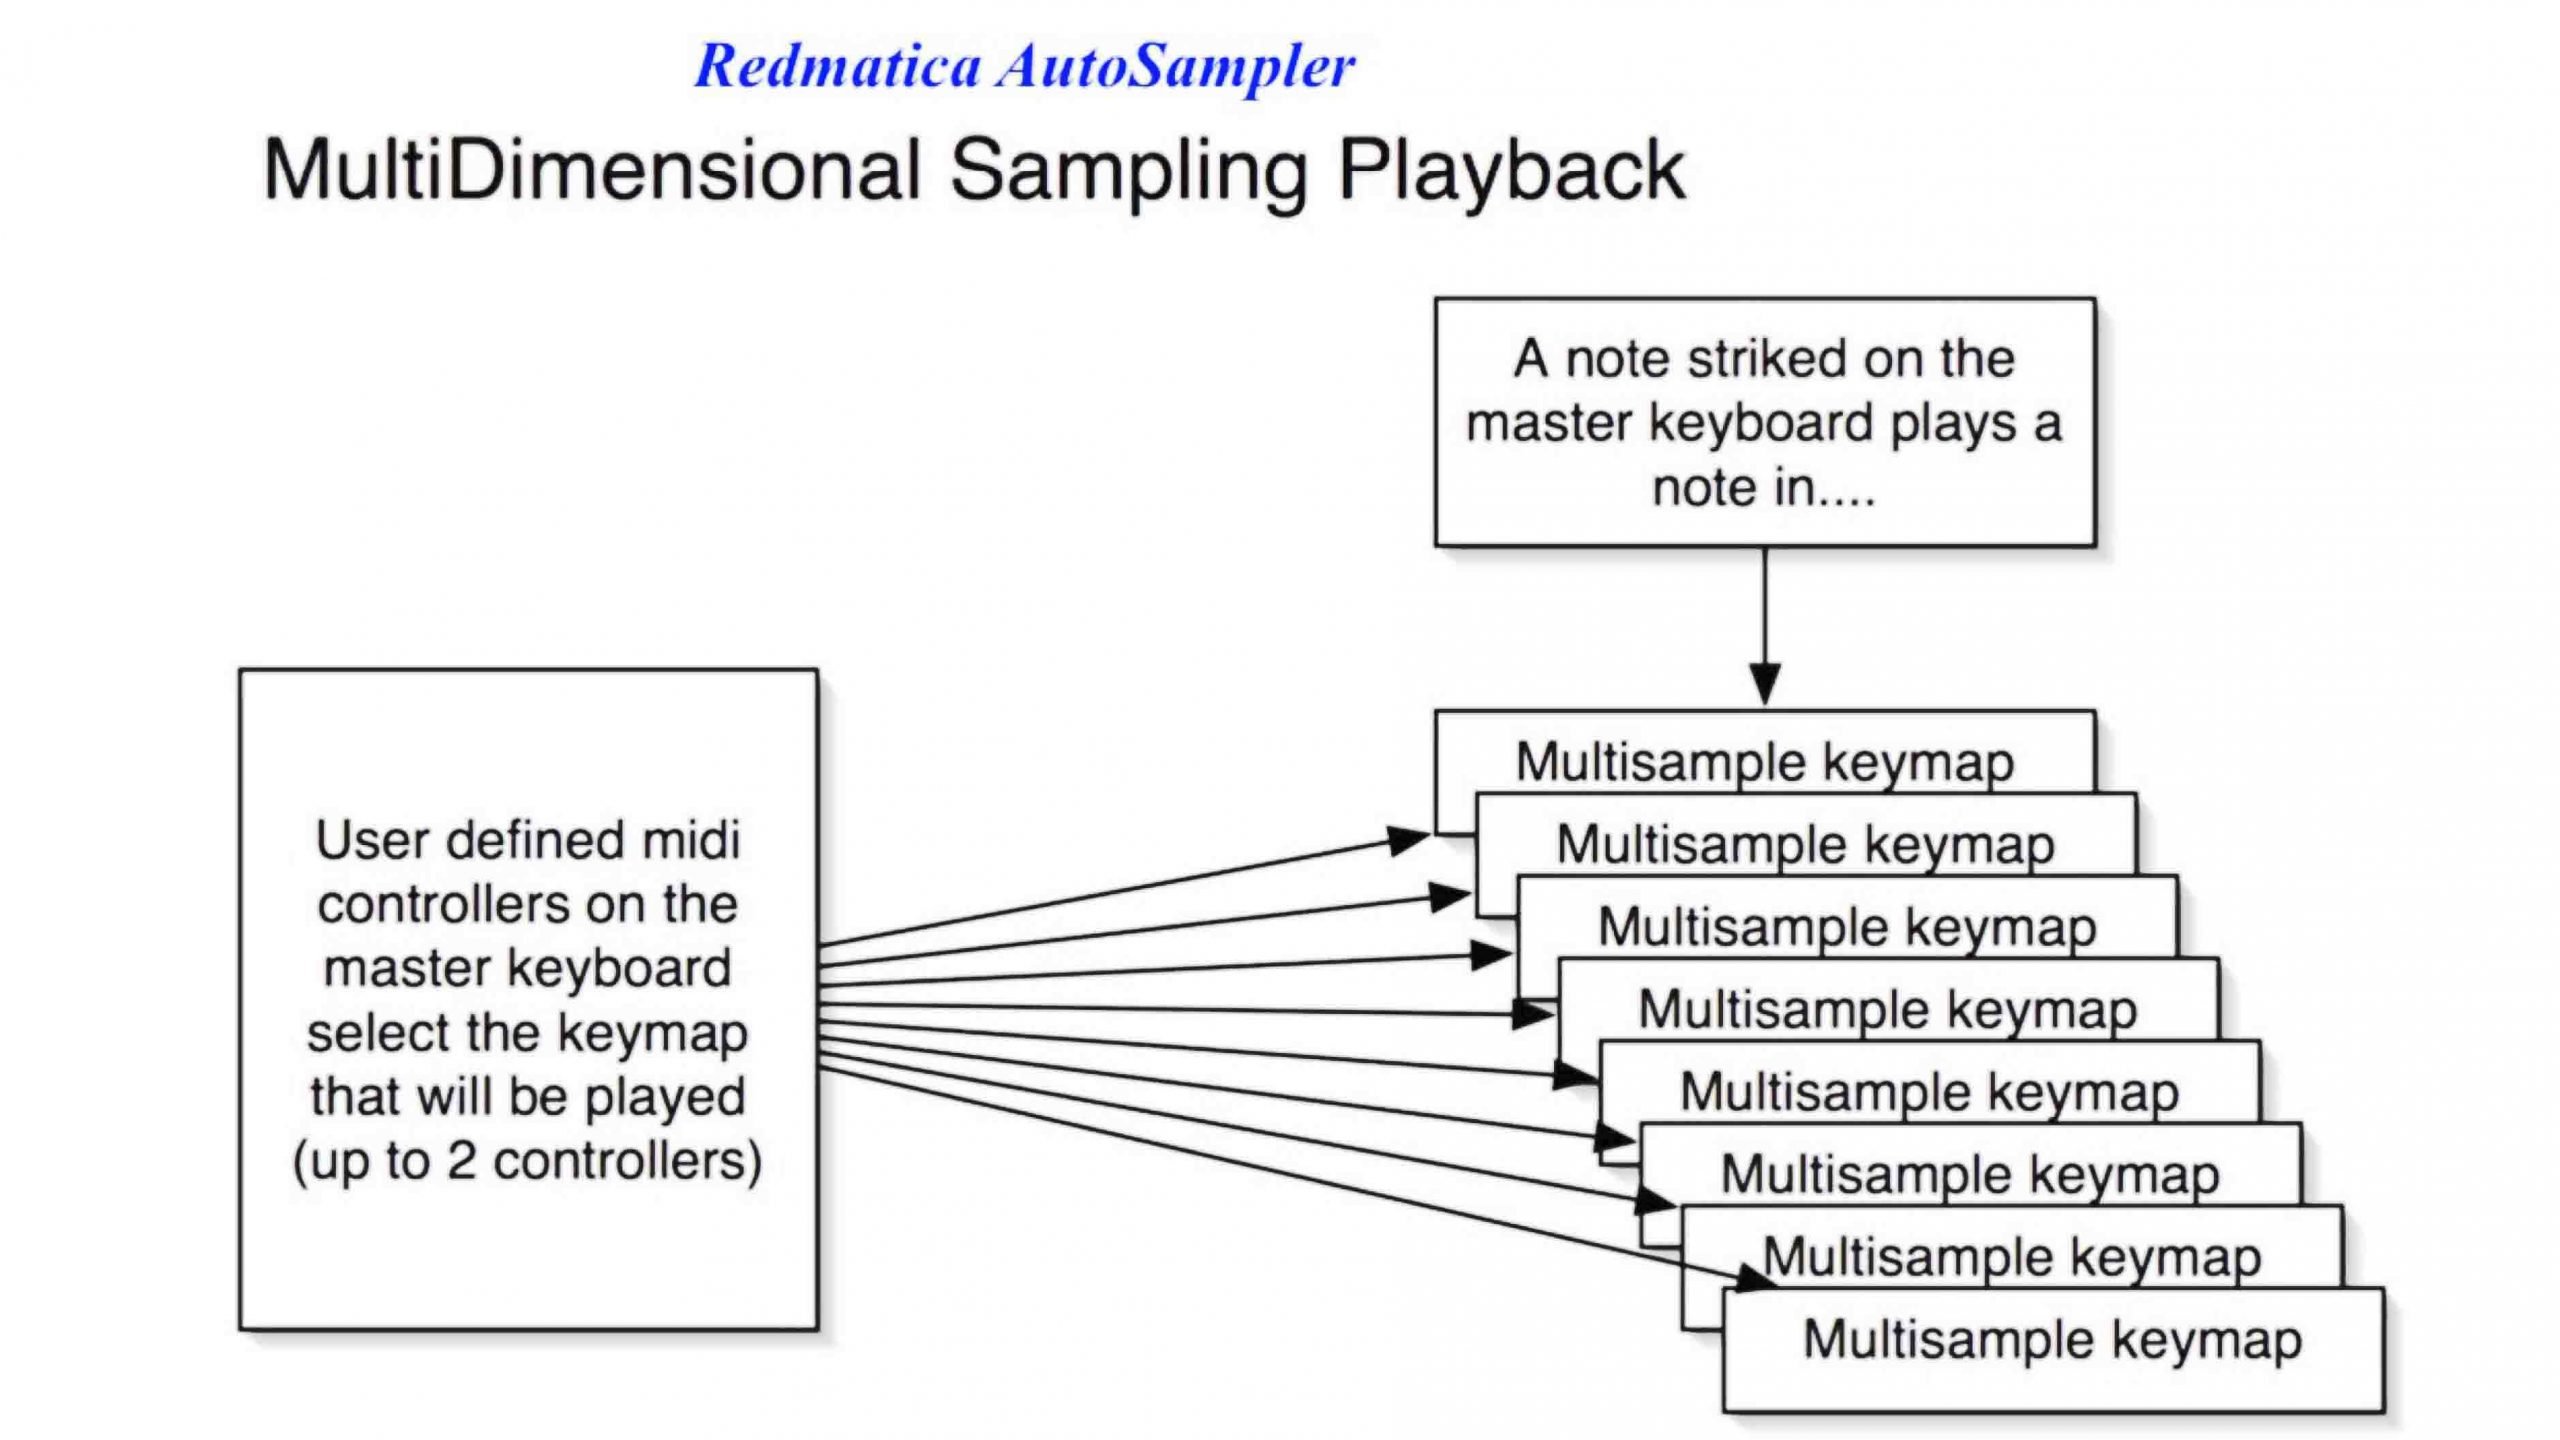
Having worked with the original software, I believe that the most demanding will first of all miss the possibility of setting Key Switches and the autosampling of multiple sounds, or banks of Presets, in a single process; moreover, the original model also allowed to be able to “enlarge” the mapping of the samples in case the sampled sound included modulation sources, such as the Modulation Wheel or the AfterTouch. In this case, AS gave way to send specific MIDI commands by setting two MDS, acronym for Multi Dimensional Sampling (Fig.9): obviously the generated KeySwitches took these choices into account.
Finally it was possible to set a threshold in dB for the tail of the samples and the Normalization, always in dB with RMS or Peak values, of each of them. Although most of these operations can be carried out a posteriori within Sampler, it would not mind if Apple included them in the AutoSampling phase in a future upgrade. Last but not least: AutoSampler had a dynamic recognition algorithm whereby if the sample exceeded the digital 0dB threshold, going into distortion, the Gain was automatically recalibrated (in -3dB steps) and the sampling process of that note was redone; a subsequent normalization algorithm brought everything back to a dynamic coherence of the entire multisampling.
Dynamic tracks
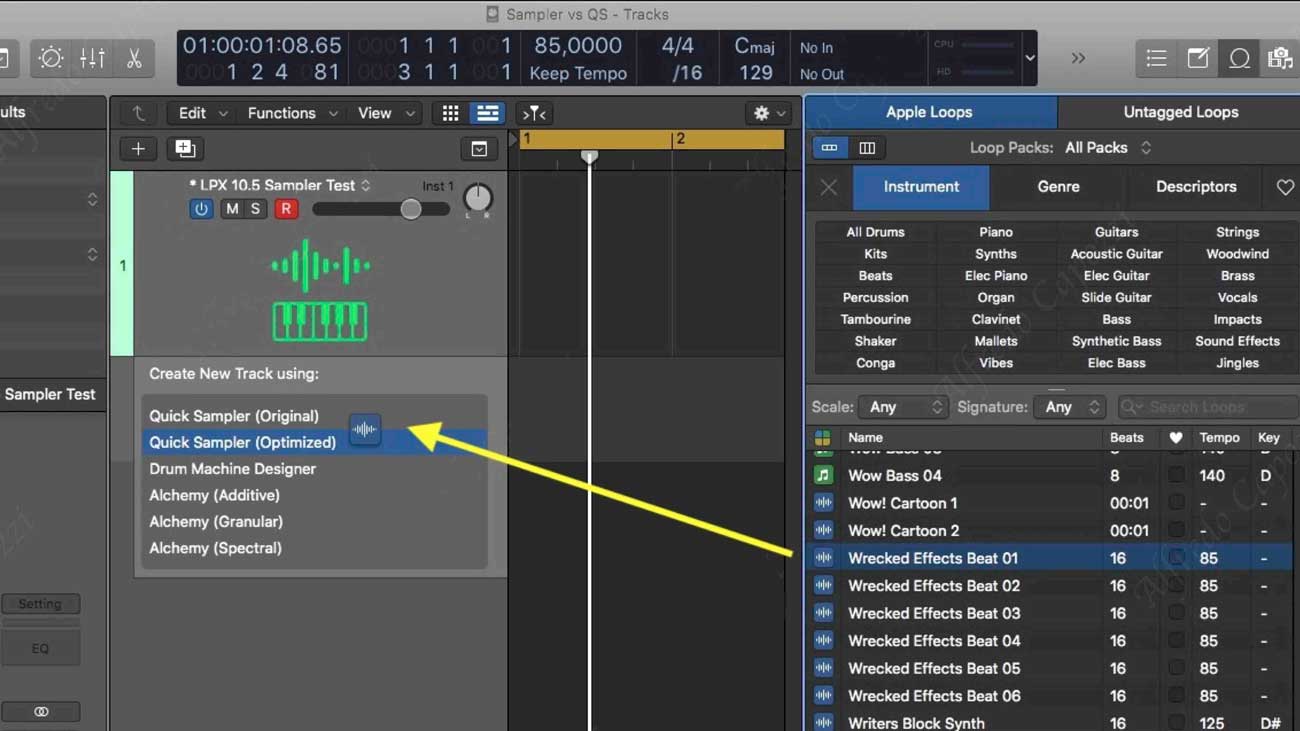
Before moving on, it is good to indicate that all the options seen for managing audio files are also extended at the track level, in the sense that if you drag one or more audio elements into the space below the last available track, a series of entries that will allow us to point those files to Alchemy, rather than Sampler or Quick Sampler. In no time a new track will be added containing the new virtual instrument with complete file mapping. There is no doubt that even this feature simplifies and makes the workflow with the DAW fluid (Fig.10).
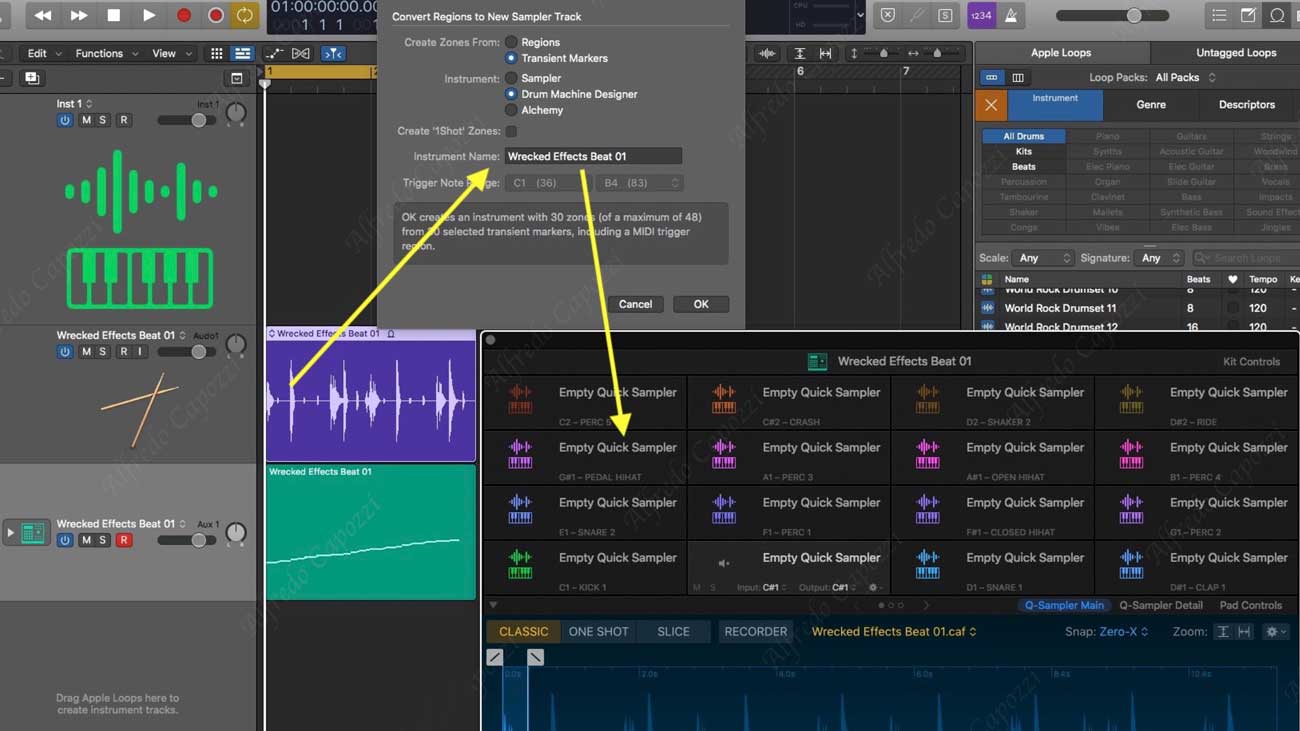
Still operating on the tracks, it is possible to drag the audio file into the Arrange to see an audio track formulated which, at this point, can be converted into a Sampler Instrument (Convert to new Sampler Track) with options that compared to the old window now include Quick Sampler / Sampler, Drum Machine Designer and Alchemy (Fig.11).
DrumSynth
Borrowed from the algorithms of ultrabeat e Drum kit Designer (DkD), the new Drum Synths currently collects 4 instrumental categories (Sound) dedicated to the main rhythmic sounds with multiple variations for each of them (Fig.12). More precisely:
- KICK: Heavy, Hard, Punch, Air, Tight.
- SNARE & CLAPS: Snappy, Air, Electronic, Mechanical Clap, Synthetic Side Stick, Gritty, Silicon Side Stick, Human Clap.
- HATS & CYMBALS: Crash, Ride, Smooth HH, Sharp HH, Bell.
- PERCUSSION: Deep Tom, Metal Machine, '80 Cowbell, Membrane, Tight Tom, Shaker.
For each Sound, which can be previewed with a click on the icon, up to a maximum of eight "essential" parameters can be displayed, capable of modifying the timbre even radically: they vary according to the sound, of course, but also with the same type (for example Kick). All listed in alphabetical order, they are:
- KICK: Body, Decay, Noise, Pitch, Punch, Saturation, Shape, Snap, Sweep, Tone, Volume;
- SNARE & CLAPS: Body, Crush, Cycles, Decay, Dirt, Noise, Pitch, Position, Size, Speed, Tension, Tone, Volume;
- HATS & CYMBALS: Attack, Bell, Body, Character, Crush, Decay, Dirt, Dissonance, Metallic, Noise, Pitch, Tone, Volume;
- PERCUSSION: Attack, Body, Color, Crush, Decay, Dirt, Dissonance, Harmonic, Material, Noise, Pitch, Saturation, Shape, Tension, Tone, Volume;
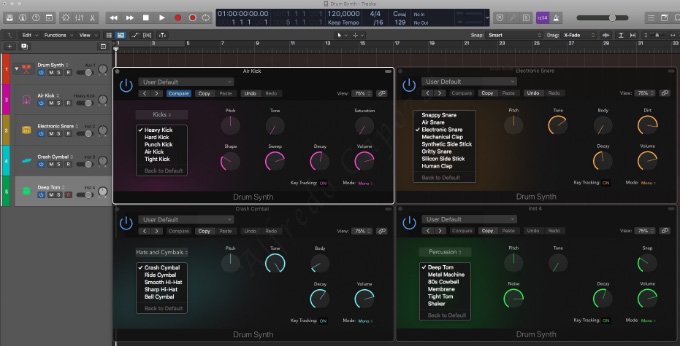
Common to all Sounds, on the other hand, is the KeyTracking On / Off (in Off the sound does not undergo changes in pitch according to the MIDI note) and the modes Suit, Poly e Gate. Having to be clear about the first two methods, I specify that Gate it is very similar to Suit, in the sense that it silences the previously played note, but to exploit the whole Decay the key needs to be held down: if you let go, the sound stops immediately.
Since with the KeyTracking active, each Sound exploits the entire range of the MIDI keyboard, the Pitch parameter goes a little in the background, unless you want to exploit the extremes of the frequency band of each sound. And what if you wanted, instead, to ensure that each Sound occupies one note or a few notes, perhaps combining several Drum Synths in a sort of rhythmic Setup? Although for individual Note / Sound ratios it is easier to look at ultrabeat or to the ready-made DMD templates (read next paragraph), it should be noted that Drum Synth can be included first of all within one or more DMD cells, thus responding to the relative MIDI note, but it is also possible to structure a Summing Track of the desired sounds and then limit the ends of the MIDI notes desired by the track parameters. In the latter case, I would not have minded that Apple itself, among the hundreds of Presets added in this release, had also included someone dedicated to this particular method of use.
Drum Machine Designer
The Drum Machine Designer (DMD) benefits from a whole series of improvements that include the ability to be quickly configured from Slice di QS rather than the conversion processes seen above. Furthermore, each individual Pad can be configured with an instance of DrumSynth.
About the binomial DMD / QS, it must be said that in this new version each Pad containing audio elements must be considered to all intents and purposes a QS, since the same parameters and functions are replicated on two alternative screens below. However, each Pad can now draw sound elements from any other instrument in the LPX library by simply clicking on the desired instrument (Fig.13).
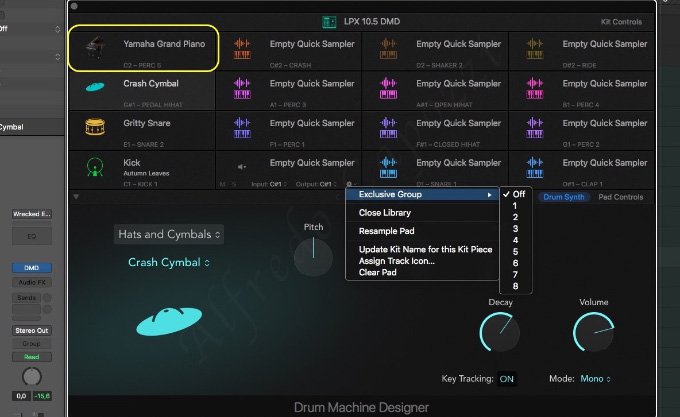
With the same logic, each Pad of DMD can accommodate an instance of the DrumSynth: considering then that DMD can be subjected to the control of the Step Sequencer (described in the first article, to which I refer you in case you missed it) it is easy to understand the potential that can be obtained in terms of rhythm from this release onwards.
iPad & Remote Control (Instruments)
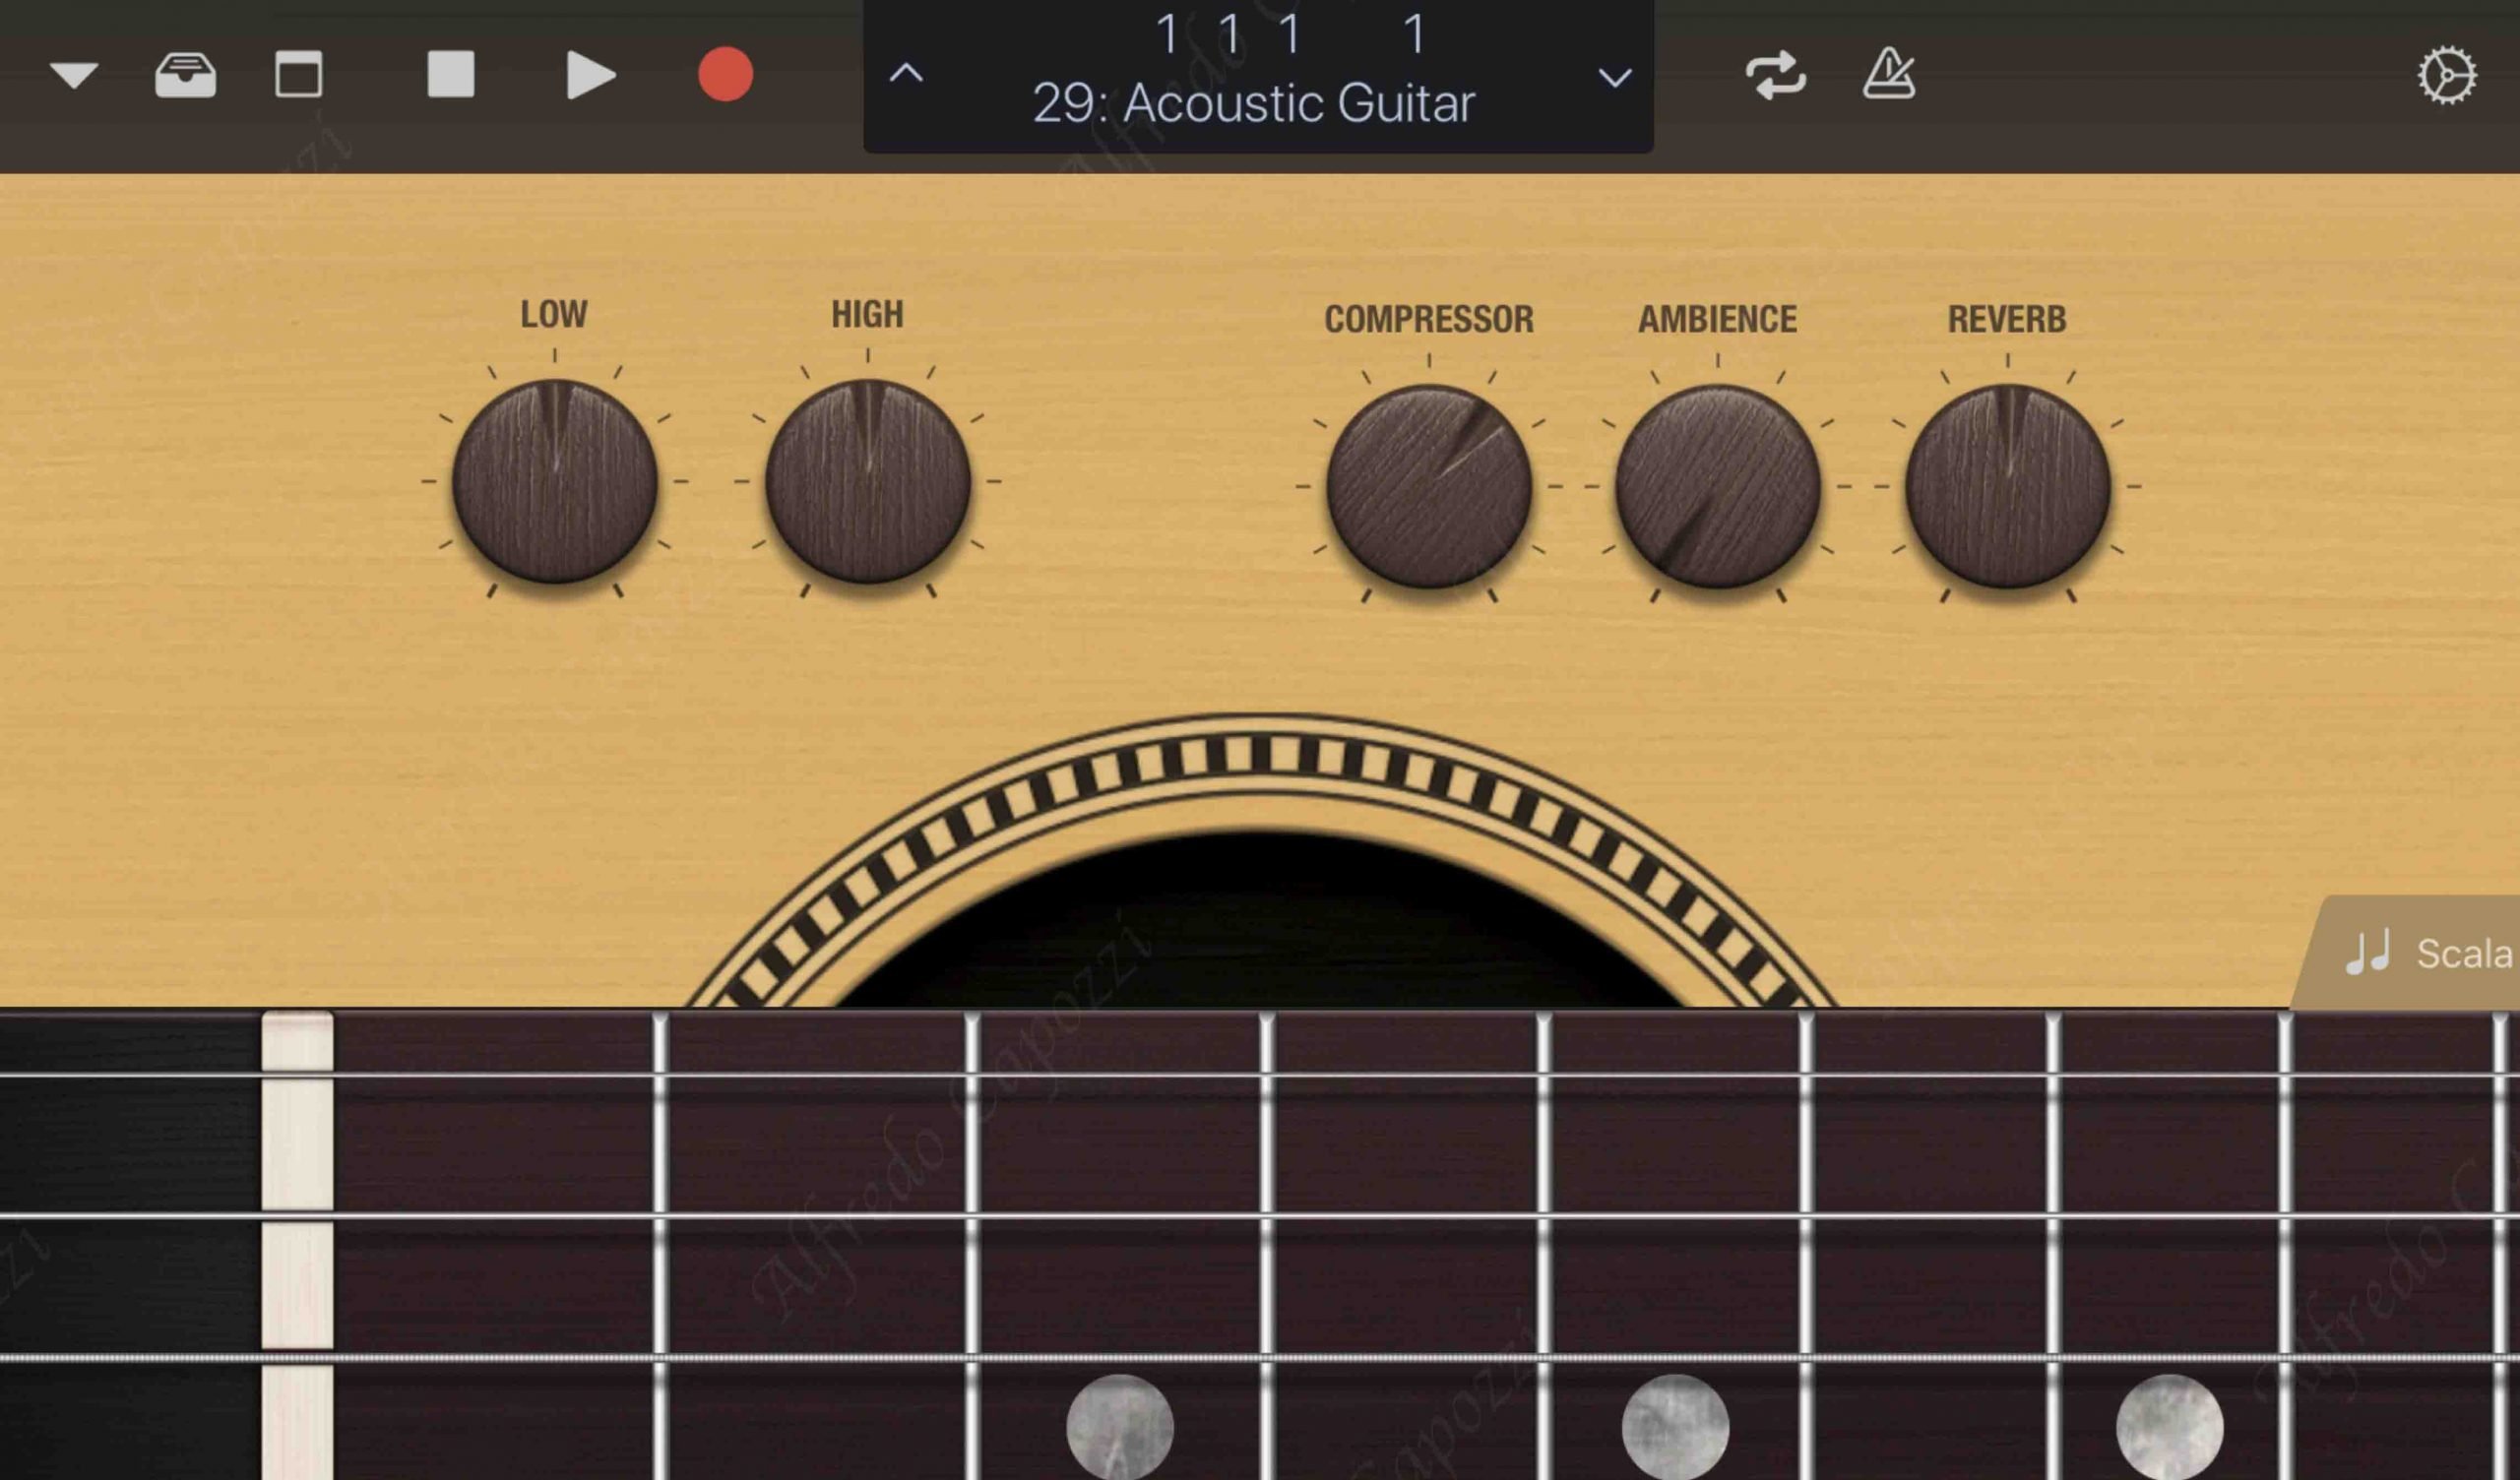
As for the "instrumental" management of the iPad, if the plug.in does not have a specific GUI (Fig.12), it is however possible to access all the parameters of the instrument in the form of horizontal sliders with which to set the values. The amount of screens depends on the number of parameters that accompany the virtual instrument. Obviously everything that is operated on the iPad can be subjected to registration, including Automations.
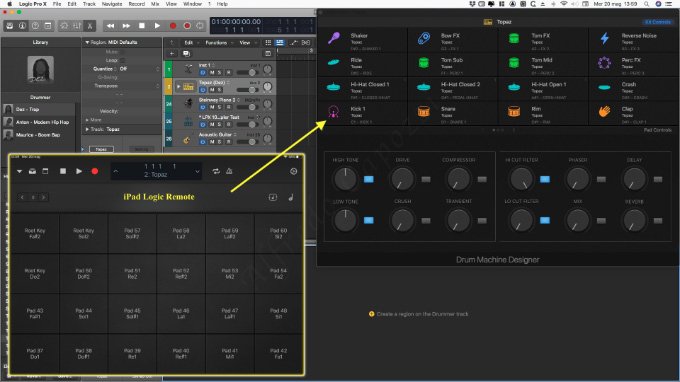
One thing I must point out is the correct and symmetrical correspondence of the DMD Pads, as well as a specific GUI, without prejudice to the possibility of recalling the DrumSets and then being able to play the same pads from the external iDevice: I think it is necessary an update also in this sense.
As the owner of an iPhone 5s, with iOS locked to v.12, I have not had the opportunity to try the new possibilities on the latter as well.
Concluding
Also for this second part it would be possible to add some more news about bug fixes or minor improvements, but at this point if you have read this far, your curiosity to proceed to an intensive use of what is described should have taken the windward.
However, it is possible that despite the notable additions of this new release of LPX, it does not satisfy all needs and this, of course, depends on the production objectives that differ from studio to studio and from genre to genre.
However, v. 10.5 in all cases it represents a good leap forward and those who have already used Logic Pro X for different versions, will have no difficulty in including all the new features in their workflow. Then it must be considered that "a gift horse ...", if it is pointed out that once again Apple "gives" this important upgrade as it has already happened from LPX 10.1 onwards. It should also be emphasized in this regard that, in respect of the choices of other Software Houses which for the intermediate releases have always presented marginal improvements, in LPX during these 7 years this has not always been the case, where minor releases have involved additions such as to consider them real Major releases.
Personal considerations are based on a daily use of the software that goes on now from the very distant Notator for Atari (of which I am still happy owner, even if the last time it was used in '99. Practically when I decided to "turn" towards the Mac and the whole Apple ecosystem. Ed).
In addition to some annotations limited to each single novelty, I believe that several things already present in other DAWs are still missing and that further simplify the production workflow, such as quick "screenshots" of the Mixer, even if in part the discourse can be circumvented. with the contextual "Save Performance" or with the Alternative Projects (much more laborious), as well as a specific search field for plug.ins on the Channel Strips (today, also thanks to targeted offers and various subscriptions, I challenge anyone not to feel the need !) even if this can also be circumvented with a reorganization of the same with the “Plug.in Manager” and the multiple possibilities of saving Presets.
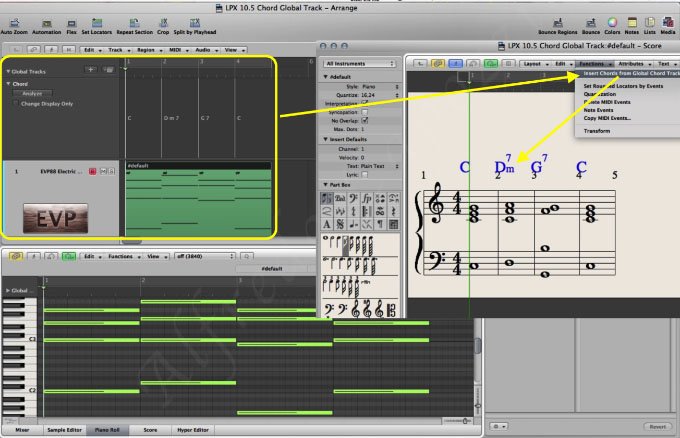
There is another function present in Logic Pro 9 and never appeared in Logic Pro X that I would like to implement as soon as possible: the possibility of generating Chords from the analysis of a MIDI track in a dedicated Global Track (PreSonus Studio One even allows it on audio tracks) and then find them available in the Score for quick writing of scores and scores (Fig.16).
Moving on to the current features, an option would be appreciated with which to open a complete DrumSynth setup / template, or perhaps pre-configured presets, of the 4 DrumSynth even if the question is easily circumvented with a personal programming and memorization of the Summing Track rather than the management of the same within Drum Machine Designer.
I conclude by noting that having made an important turn with Sampler, with the next releases it is expected the possibility of being able to program the GUI of the plug as desired, at least as much as the proprietary software houses do not do with Contact, Falcon, Halion and that Apple itself has shown ahead of time that it can do with Studio strings e Studio Horn. We look forward to!
For the moment…
… good music!
Note: musical computer science is not an exact science and all written considerations are the result of personal experience in the daily use of the software under analysis.