

Oeksound is a Finnish brand born in 2016, with the aim of producing new and innovative tools. An interesting idea, if we consider the fact that the crazy analog in the box market is, as far as I'm concerned, already quite saturated.
To date, it has only developed two plugins but, despite this, the brand has made headlines in recent years, and we will soon try to understand why. I had the opportunity to thoroughly test both products, and today we will analyze them individually.
SOOTHE we can define it as the workhorse of the brand, as well as one of the most talked about plugins on the web, recently updated to version "2".
For the moment, let's dive into the past and start from the origins:
Soothe v1.
It is called "dynamic resonance suppressor"; in practice, it analyzes the audio material, automatically detects resonances and suppresses them in a dynamic way, giving the user the possibility to manage this process, thanks to the parameters present on the interface.
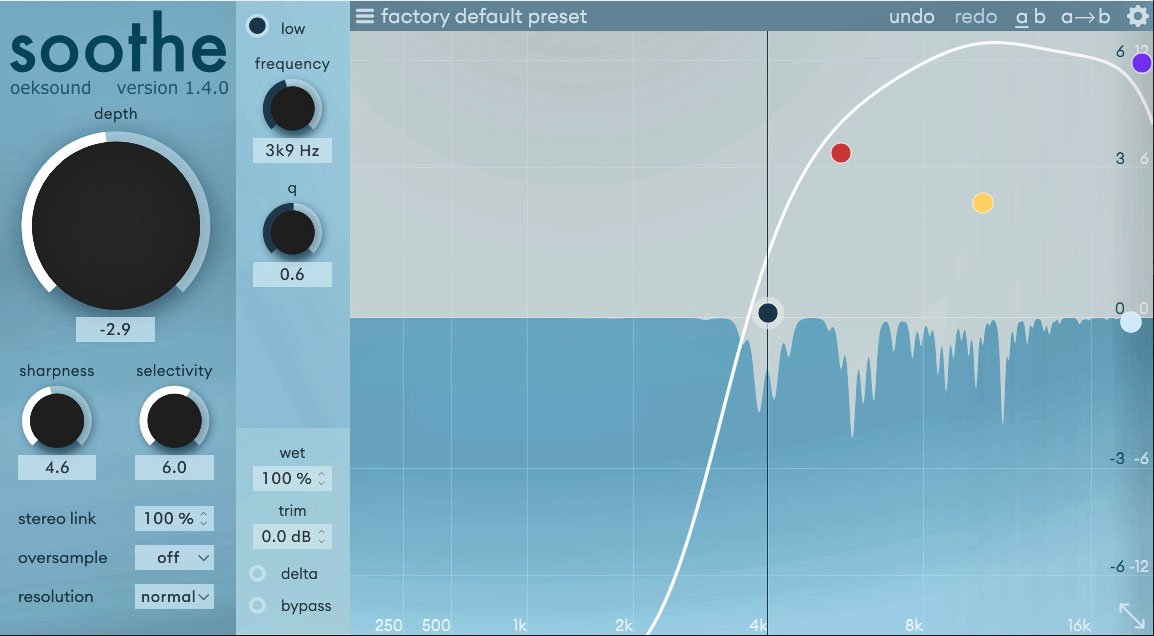
At first glance, the five filters, marked by colored dots in the center, immediately make us think of a dynamic equalizer; in reality the concept is very different.
Thanks to the high pass, the low pass and the three bells, we can involve a specific range of frequencies in this suppression process and safeguard others. For example, using the high pass filter, I can focus more on the high frequency range, thus taking into consideration all the resonances present in this set which, inevitably, will be involved in this operation; by further helping myself with a bell, I can put, even more, the range of frequencies in question, with the related resonances. Each of these five filters can be parameterized and deactivated.
Thanks to the big knob depth I regulate the amount of the process.
With control sharpness I adjust the Q of all the resonances: a high value certainly increases the precision of the intervention but, the artifacts are around the corner, especially if you exaggerate with depth; using a low value, on the other hand, I physically obtain filters that look more like bells, therefore more smooth, as the Q decreases. In this case the artifacts are decidedly lower but the operation will not be surgical, and will tend to involve, more than anything else, the general timbre of the audio source.
Another important parameter is selectivity. By setting it in conjunction with the aforementioned control, we can precisely increase the selectivity of the frequencies we intend to suppress: a high value will lead this processor to further reduce the important resonances; while a low value will make the device work as a “tone-shaper”.
The correct setting of these controls depends on the problems that arise in real situations; so there is no “scholastically wrong” setting but our ears exist which, we must not forget, are our main working tool.
In the box at the bottom and in the center, there are: the classic control trim, with which we can adjust the output; the button bypass (internal); the button delta, thanks to which it is possible to hear the difference between dry signal and processed signal, as well as what this plugin is actually suppressing; and finally, there is the classic command law, or if you like species, thanks to which we can carry out parallel processing very easily. For example, you can go overboard with the depth control and then find the right dry / wet balance, to avoid putting too much emphasis on a heavily processed sound.
There is the possibility to link the left and right channels or not, using the appropriate control stereo link. Setting it to 0% (dual mono), the left and right channels will work independently, without affecting each other; in this way we try to safeguard the stereo image as much as possible. Setting it to 100 % (full stereo link), the two channels influence each other during the suppression process, with potential consequences on the width of the stereo image, to the advantage of monocompatibility. In any case, you can use intermediate percentage values if you like.
Personally, I hardly ever link channels when I use dynamics processors, for a stylistic matter; this does not mean that using a different setting is wrong. The ears will always be your best ally in these cases, without forgetting the central screen, thanks to which you can see the part of the spectrum that is involved in the process.
Note the sections oversample (up to 4x) and resolution (normal, high, ultra) that will surely satisfy the most “audiophile” users. It is clear that modifying these two values leads to an increase in CPU consumption, to the advantage of greater algorithm precision (in short, modify these values at "your own risk" if you deem it necessary).
Above you can store two presets, AB, to make quick comparisons.
The undo and redo commands present, by now, in various modern plugins that we can find on the market are also very useful.
The menu is accessed at the top right global configuration options.
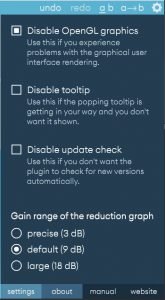
Among the options available, one in particular stands out, namely the one relating toOpenGL graphics.
Some users may have graphics cards that carry an unwanted increase in CPU consumption, for this plugin in particular (a lot also depends on the type of computer we have). By enabling this option we could, in all probability, solve the problem (I often enable it).
Clearly, disabling the OpenGL, you have consequences on the fluidity of the image, which could hurt the sensitivity of, nicely speaking, "graphics maniacs"; the sound obviously remains unchanged.
Please note that this plugin was not really designed to work in the low range; in fact, if you look closely at the image, the logarithmic scale does not particularly focus on the low range. This is because, initially, soothe was designed to control the resonances present in the mid and high range, as well as contain the “harsh” part of the audio material.
This limitation has been lifted with the update to version 2, in which other features have also been added that we will explore below.
SOOTHE 2: the "revised and corrected" version
The company has practically revisited the algorithm of the first version, also enhancing it with additional controls.
Let's start from the central part of the interface.
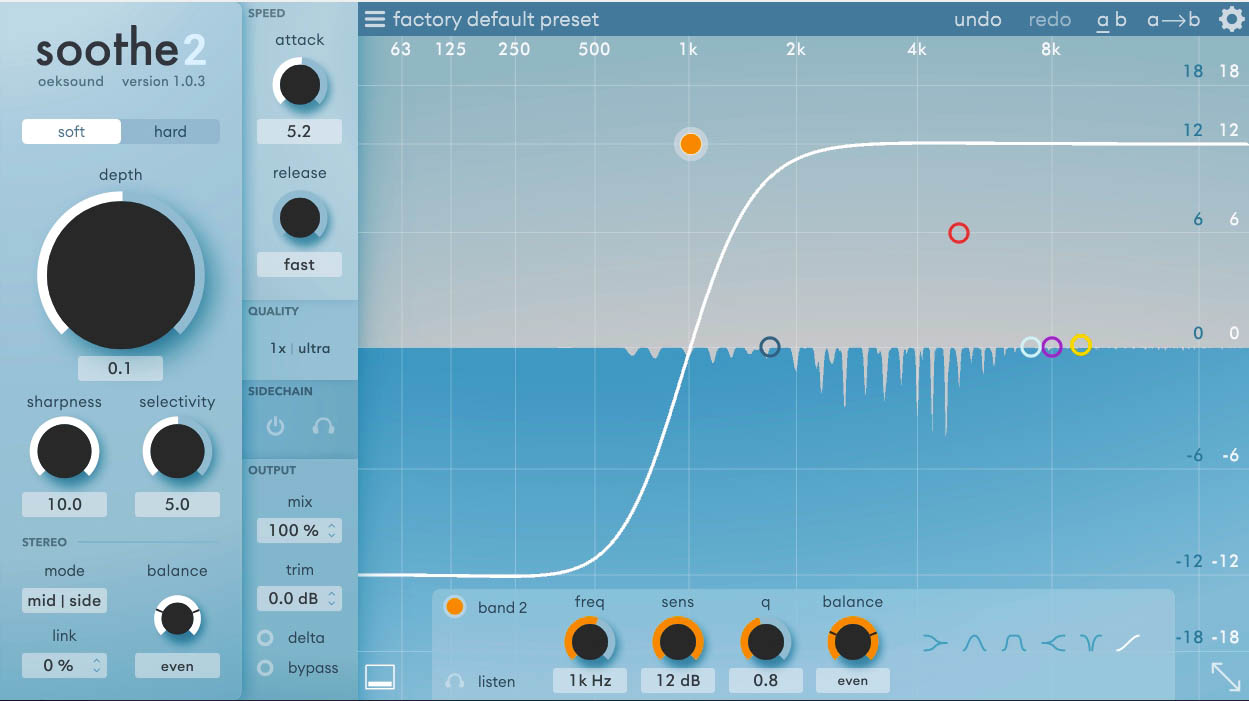
For the high pass and low pass there is the possibility to adjust the slope (up to 48dB per octave); another band has been added and, for each of it, we can choose between: low shelf, bell, band shelf, high shelf, band reject and tilt.
It is also possible to “solo” the single bands, thanks to the command listen, or by holding down the alt key (if you have windows) and clicking on the band concerned, which is useful if you want to understand, in a precise way, what is the range of problematic frequencies we want to control.
You can notice the presence of the controls attack and release (they refer to the whole process), which make us think of a much greater versatility than its predecessor; imagine you want to safeguard the transients a little more (not "fast" attack) and, perhaps, keep the resonances under control for longer (not "fast" release).
A external side chain, which can be activated from the appropriate button, which we can obviously listen to.
They have been added soft and hard modes; the latter can be useful when we want to attenuate the audio material we have chosen more clearly, as the processor will tend to react much more easily to the incoming signal. The soft mode is defined, however, more transparent.
In this version there is the mid-side mode, which will surely have appreciated those who work with complex stereo tracks (mixbus for example).
The knob Libra, which you find at the bottom left, is able to modify the processing balance applied to both channels (left-right or mid-side); for example, by turning the knob clockwise (mouse up), I will keep the right (or mid) channel processed at 100%, leaving the left (or side) channel totally unprocessed, without forgetting all the other intermediate values that we can get.
For example, let's imagine that we want to dedicate ourselves to the mid and the side separately, in that case we will load two instances, one dedicated to the mid and another dedicated to the side, adjusting this command accordingly.
Each of the six bands contains a balance knob, not to be confused with the one we talked about earlier.
For example: let's take the high pass filter as a reference and, for simplicity, turn off all other bands.
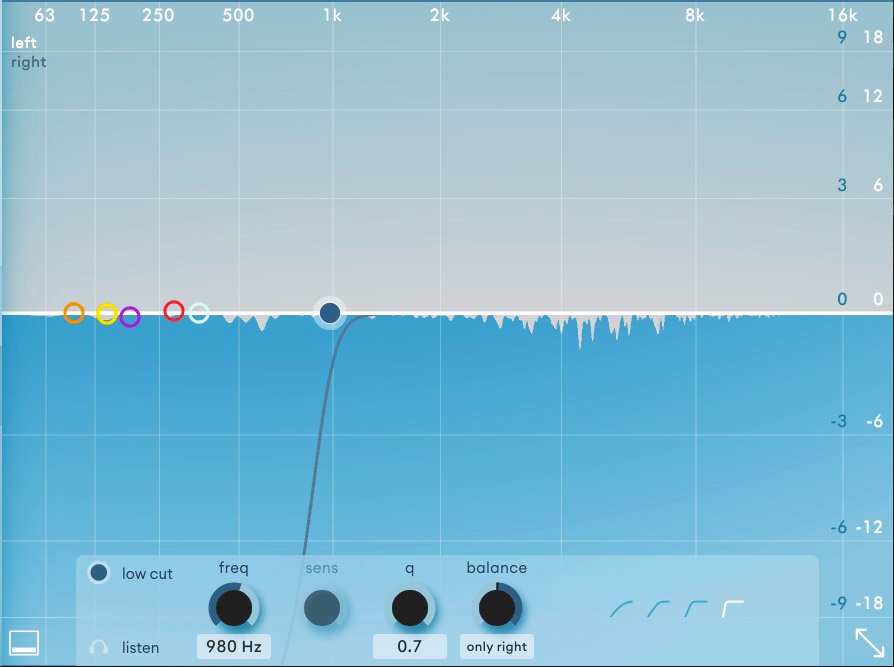
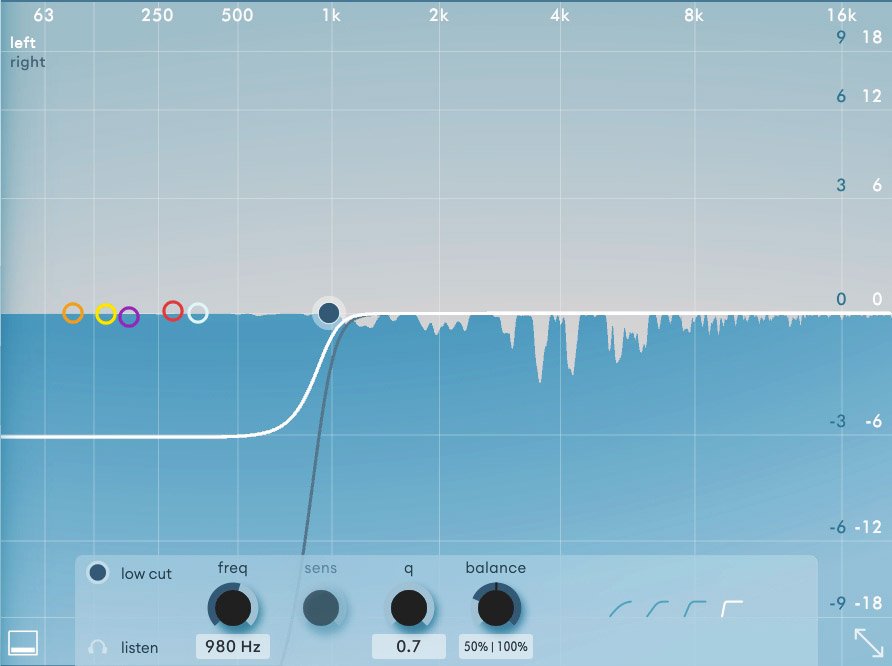
By adjusting the balance all clockwise, the frequencies that I have decided to involve in the process, thanks to this filter, will be attenuated only in the right channel (black curve); the left channel (white line) is processed, but in full band mode since the high pass filter affects only the right channel. The same is true if we work in mid-side mode, as well as for all other bands.
Using intermediate values, a situation arises that will be easier to understand after seeing this image.
This check can come in handy when we want to avoid loading another instance, thus saving CPU, and especially when we have different problems on different channels, so we need more precision.
I would say that, once again, I imagine it on stereo-complex material.
As regards oversample and resolution, the following changes have been made:
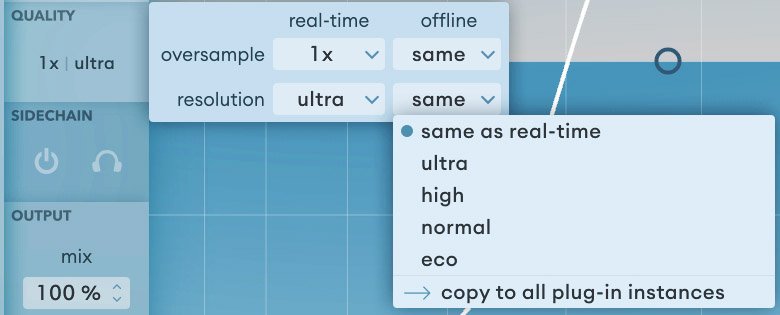
Resolution is available eco, which will undoubtedly make "avid" CPU savers happy. They also gave us the ability to adjust these settings both in mode real-time, that offline (bounce / render phase) and if we want we can copy them in all the instances present in the session.
I also found, compared to version 1, a lower loading time, and a more responsive graphical interface, as regards the resizing.
As mentioned a few lines ago, with soothe 2 it is possible to process, without too much difficulty, even the low range.
So with these upgrades, in addition to the algorithm, versatility has also been enhanced, taking this plugin to the next level.
Latencies and CPU consumption
This plugin falls into almost all of the CPU consumption categories that I have listed in my previous articles.
We start from a barely low consumption (eco mode and no oversampling), up to an extremely high consumption (ultra mode and 4x oversampling).
The tests were carried out at a sampling rate of 44100 Hz, using Reaper as a DAW, in a Windows 10 environment.
As for the latency, although it has been halved after the update to version 2, it is still objectively not indifferent (2048 samples against 4096 of the first version); this thing doesn't scare me that much, bearing in mind the fact that we have an internal bypass that avoids those annoying click-pops, typical of external DAW bypasses and, given the complexity of the algorithm, that was to be expected. Then a lot will also depend on the overall latency of our session (buffer size included).
Practical feedback
Soothe2 is an undoubtedly modern plugin, which we can define as a tool aimed at "problem solving", which can be useful in any situation: we can use it on the voice as a de-esser, perhaps a more sophisticated de-esser, given the complexity of the algorithm, seen and considered that it can work surgically.
We can use it to remove the “boomy” part, in reference to some problematic notes, for example, of the bass, or to contain the annoying low range of any track, which needs a “repair”; we can use it to suppress the resonances of the whole spectrum, working "full range" (all bands deactivated) and also try to balance the frequency response in general; it can be useful on the piano, as it is a very dynamic instrument and often contains resonances, as do electric guitars; again it can be useful on the overhead track of the drums (or maybe on the whole bus of the latter) or, with another example, I can compress the low range of the electric bass, using the drum case as an external side chain, a technique certainly known which, if applied using this plugin, could give interesting results in more problematic situations.
The use in mastering is inevitable, perhaps in mid-side, especially if we are working with “tiring” tracks, from the listening point of view.
Do not confuse it with a classic dynamic equalizer but, see it as a tool that can also take the place of the dynamic equalizer, set in the appropriate way. Also if we want we can use it (why not) for sound design, given that there is the possibility of creating and / or listening to artifacts (with the delta).
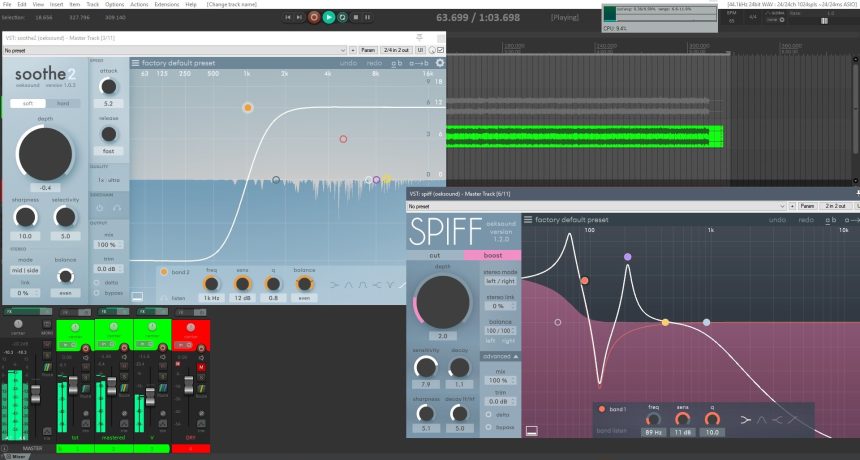
SPIFF
The company's second product is called the “adaptive transient processor”; in a nutshell what does it do? It analyzes the audio material and processes only the information containing the transients, and it does so in a spectral, as well as detailed, way. Let's try to understand more.
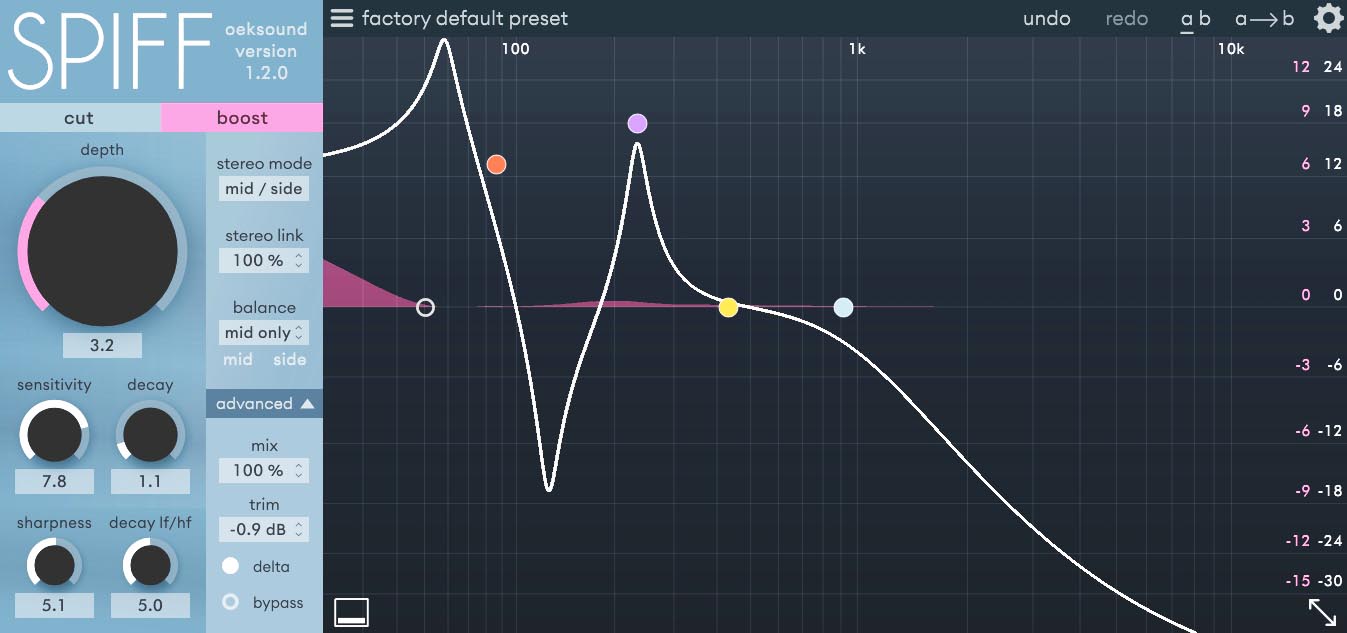
At this point the interface will certainly be more familiar to you, in fact you will notice some functions already analyzed previously.
This processor is capable of working in the cut mode (attenuate transients) or in the boost mode (emphasize transients).
We have five filters that are similar, if not the same, to those previously analyzed (high pass, low pass and three bands). For example, thanks to these, we can emphasize or attenuate transients, within a specific range of frequencies.
Looking at the left part of the interface we notice: the already mentioned depth knob; the sensitivity control, with which you can adjust the sensitivity to transients: with a high value, the plugin will detect more transients, with a low value it will detect less. It all depends on how many details we want to attenuate, or boost, according to the track we work with.
The sharpness control has a function similar to the one analyzed previously, ie with a high value (high Q) more surgical interventions are performed, while with a low value (low Q) we obtain more natural, albeit less detailed, results. The manufacturer recommends using a high value on polyphonic material.
Control decline, refers to the global decay time (of the individual boosts and cuts), and it is possible to set this time more precisely by acting on LF / HF decay: in practice, setting it all counterclockwise, I have a slower decay on the low and faster on the high, and vice versa.
Generally with a low decay I can boost or attenuate only the right transients (short duration); with a very high decay time, the intervention is almost static, that is, more than emphasizing or attenuating transients, I involve a larger and more complex portion of audio material.
The delta function, in these cases, is very useful to understand precisely what you are emphasizing or cutting.
Completing a part of the interface are the already known mix, trim, bypass, stereo mode, stereo link and balance controls.
Let's go and discover the advanced menu now.
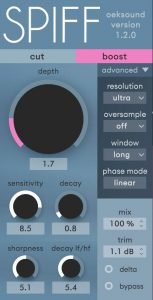
Resolution (normal, high and ultra) and oversample (up to 4x) need no further clarification from me.
In the window, on the other hand, it is possible to set the "tradeoff between time and frequency resolution", as the manual states.
I'll try to explain it to you in a practical way: a window value of type shorts, it is recommended when working with very fast transients, such as the classic clicks (to be removed) for example, ie transients that do not have much energy in the low range; this is because the low frequencies have longer transients, compared to those of the high frequencies, and therefore a greater decay, and consequently a larger "window".
At this point it is easy to understand that, by setting window to short, you may encounter problems with regards to the detection of transients in the low range. Using a window value of type long, we can get smoother sounds and better low range detection, and maybe think about using it when working with polyphonic material. A window value of type medium, could represent a good compromise between the two situations, as well as a good starting point.
In the phase mode you can choose between linear and minimum, terminology often associated with digital equalizers, on which I will not dwell too much as regards the mathematical explanation; trying to be practical, the linear phase mode behaves better when dealing with sharp and surgical cuts, perhaps in combination with a window short.
The minimum mode is clearly less precise than the previous one, but more natural from the sound point of view, and it performs well when we need to boost, even more so when we want to get a more natural result. The latter mode brings a slightly higher CPU consumption than the previous one.
Beyond what the manuals can say, the correct setting of these two values always passes through our ears, and from the goal we want to achieve; so I think it is worth experimenting by trying less “conventional” settings, even at the cost of taking a little more time than in an average situation.
The delta function and our ears will always be our best allies, for a change. To complete the interface there is the secondary menu (global configuration option) identical to the previous one.
Latencies and CPU consumption
This plugin has a latency of 4864 samples (similar to soothe v1), working under the conditions specified above, and has CPU consumption similar to that of soothe 1/2, so the same concepts are valid for this last plugin.
Practical feedback
Spiff is an equally modern plugin that offers us the possibility of being able to handle transients in a very precise way, and is well suited to multiple applications.
For example, we can use it to remove unwanted clicks from the voice, from the bass or in general to attenuate all that we consider intrusive / noise, from the point of view of transients, along the entire spectrum or in a specific range of frequencies.
We can use it on percussive material to try to emphasize the attack / tail of the percussion, or simply to give a "kick of life" to audio material with an uninteresting attack.
Also in this case, the application on the mixbus is inevitable; imagine for example a mix that is too flat / compressed, which needs a bit of vitality, perhaps only in the mid part, leaving the side intact; or on the contrary, a mix with too angular transients that need to be softened.
Working on the side we can give more excitement to the stereo image of the track, we can give more attack to the bass, or we can contain the attack of consonants in the voices or attenuate the attack of any track we want, in general.
Do not see it, therefore, as a classic "transient designer", but as a tool that can be used, of course, as a transient designer, perhaps more surgical than conventional ones, but also as a tool dedicated to problem solving. There is certainly no shortage of applications.
The verdicts
At this point we just have to sum up, as usual, trying to be lucid and exhaustive.
SOOTHE 2
This product is sold for € 199, while owners of soothe v1 can purchase the upgrade for € 50.
The list price is certainly not affordable, it is probably a figure that not everyone can invest; imagining those who work in the home studio, moreover, in a hobby way.
On the other hand, if we want to balance the strengths of this plugin and the work behind it, we can easily realize that the price is right.
This tool certainly saves us time when we have to remove all those annoying resonances, avoiding us to load more than one plugin to solve this thing, and then maybe get to the end, to a not too natural result, contrary to what Soothe2 guarantees us. in most applications for which I have been able to test it.
The sound is convincing, transparent and certainly not lacking versatility. Until recently he had no competitors capable of seriously frightening him.
Recently a brand, which I do not mention, has launched a plugin on the market that would seem, at least from a graphic point of view, to be the reproduction of Soothe 2, at a more competitive price.
I would say that this is right because, from what I have been able to test, and as far as I am concerned, the competitor still does not reach the overall quality of soothe 2, even if it tries to take its place in all respects.
An instrument already performing in version 1, and that in version 2 is undoubtedly confirmed, even more, necessary for those who have to deal with tracks with a slightly too digital sound, which need to be softened, or in any case problematic tracks in some frequency ranges; all for the benefit of less listening effort and saving as much time as possible (time is money, don't forget that).
With this last statement I do not want to pass this message: "so everything is arranged in post production"; in fact, recording a track in the best possible way is always the basis of a well-executed job.
The fact remains that this plugin can come in handy regardless if a track needs to be "repaired" or not. In any case, we cannot perfectly predict the evolution of the tracks during the mixing and mastering phases.
I would like there to be other bands and / or further flexibility on the part of these, in order to have the possibility to focus on the portion of the spectrum I choose, in even more detail.
A knob to adjust the input would be a good idea, as I could control the gain staging (and therefore the amount of processing, especially when using a slow attack) regardless of the level of the input track; this would obviously involve a modification of the trim control, which currently works exclusively in boost and not in attenuation (as it should be). Alternatively, you could simply boost the depth control.
I would also like to be able to independently adjust the output volume of the two channels (especially mid and side).
In any case, soothe 2 is definitely a tool to keep "at hand" at any time, so I feel I can recommend it.
SPIFF
This product is sold at a price of € 149, a bit more “affordable” than the previous one, but still important and, in my opinion right, considering also in this case, the work carried out for its realization.
Also in this plugin you can see the hand of OEKSOUND and its basic idea, based on the concept of precision and detail.
A plugin like this, besides giving us the possibility to handle the transients in a capillary way, is also able to repair the audio tracks, acting as a de-click; everything is done in a precise manner, without wasting too much time, in relation to the number of controls present on the interface.
Versatility, also in this case, is not lacking. By experimenting it is possible to obtain some interesting results which, with conventional transient designers, are difficult to obtain.
Most likely this plugin will also be updated in the future; I expect more bands to be added, more flexibility and maybe some new features that might surprise us. I would like to have an enhancement of the depth knob for this plugin as well.
Ultimately, spiff is also an instrument to keep in your arsenal, especially for those looking for versatility and professionalism, without compromising on the sound point of view. I would say that this product has also satisfied me overall, and I can only recommend it.
As far as I'm concerned, today, we don't necessarily need yet another “analog in the box” plugin, especially if this is an end in itself; we run the risk of becoming compulsive collectors, without being able to bring real added value to our sound.
Nowadays we are looking for modern and innovative instruments, able to improve the sound, solving various problems, and which at the same time allow us to save as much time as possible; however this does not mean that you have to delegate everything to the post production phase, as I told you before.
There is still no software capable of replacing the capabilities of the human being which, fortunately, still have a significant weight.
Ultimately it is right to invest in plugins that give character to the sound, but we must not neglect purely digital instruments, which can make us reach a XNUMXst century sound, and we can say that OEKSOUND certainly responds to this last expectation.
I remind you that you can try these products for 20 days (make sure you have them installed on your computer iLok License Manager and to have an associated account) and in addition the brand, at least once a year, makes discounts on its products.
For today the review ends here, I give you an appointment to the next article ...
Joseph Marrazzo


